Integrations
Integrations are Home Assistant’s connections to the outside world. They bring in weather, media, calendars, phone location, notification services, and physical devices. This chapter walks through the setup flow in detail, then shows you how to recover an integration when it fails.
Why integrations matter
The previous 13 chapters largely dealt with organizing what Home Assistant already contains: areas, names, dashboards, automations, and scripts. A new Home Assistant installation, however, has very little in it. Think of it as an empty home with finished walls and working outlets, but no appliances yet.
Adding an integration is how you plug those appliances in. An entrance light that turns on at sunset needs sun or weather data. Music that starts when you arrive home needs both location and media entities. A washing-machine alert needs a notification channel.
By the end of this chapter, you will be able to:
- Understand the integration → device → entity relationship, including what else disappears when you remove an integration.
- Complete setup flows that ask for credentials, an API key, or a QR code.
- Understand why OAuth authorization often fails because a URL does not match, and know how to fix it.
- Determine whether an integration depends on the cloud or works locally, and predict what happens during an internet outage.
- Download diagnostics, reauthenticate, reload, and cleanly remove a failing integration.
Integrations, devices, and entities: the three-layer model and config flows
The relationship in one sentence
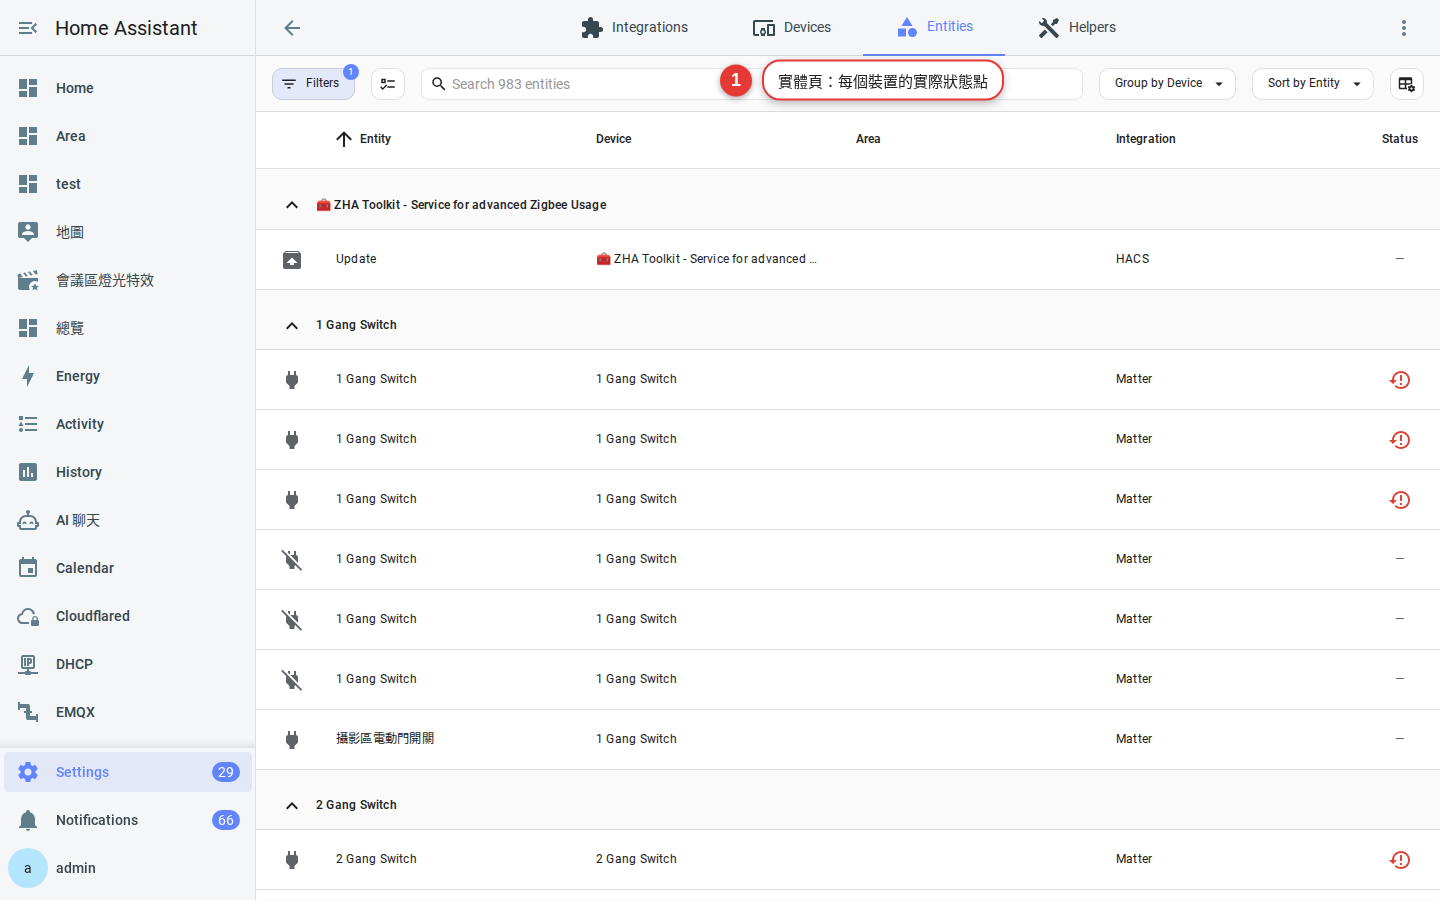
An integration is code that understands a particular brand, protocol, or service. Once configured, it may create one or more devices; each device may then expose several entities. Entities are the individual controls and readings that appear on dashboards and in automations.
| Layer | What it is | Living-room example | What you can do with it |
|---|---|---|---|
| Integration | A module that communicates with a brand, protocol, or cloud service | The Google Cast integration | Add, reload, remove, or download diagnostics |
| Config entry | One saved configuration or account; an integration can have several | The “Living Room Chromecast” entry | Rename, reconfigure, disable, or delete |
| Device | A physical or logical device | The Chromecast connected to the living-room TV | Assign an area, check firmware, or rename it (Chapter 11) |
| Entity | The smallest readable or controllable unit | media_player.living_room_tv | Add it to a dashboard or use it in an automation (Chapter 12) |
binary_sensor and a calendar entity without creating a device. Look for them under Entities rather than Devices. This is expected behavior, not a fault.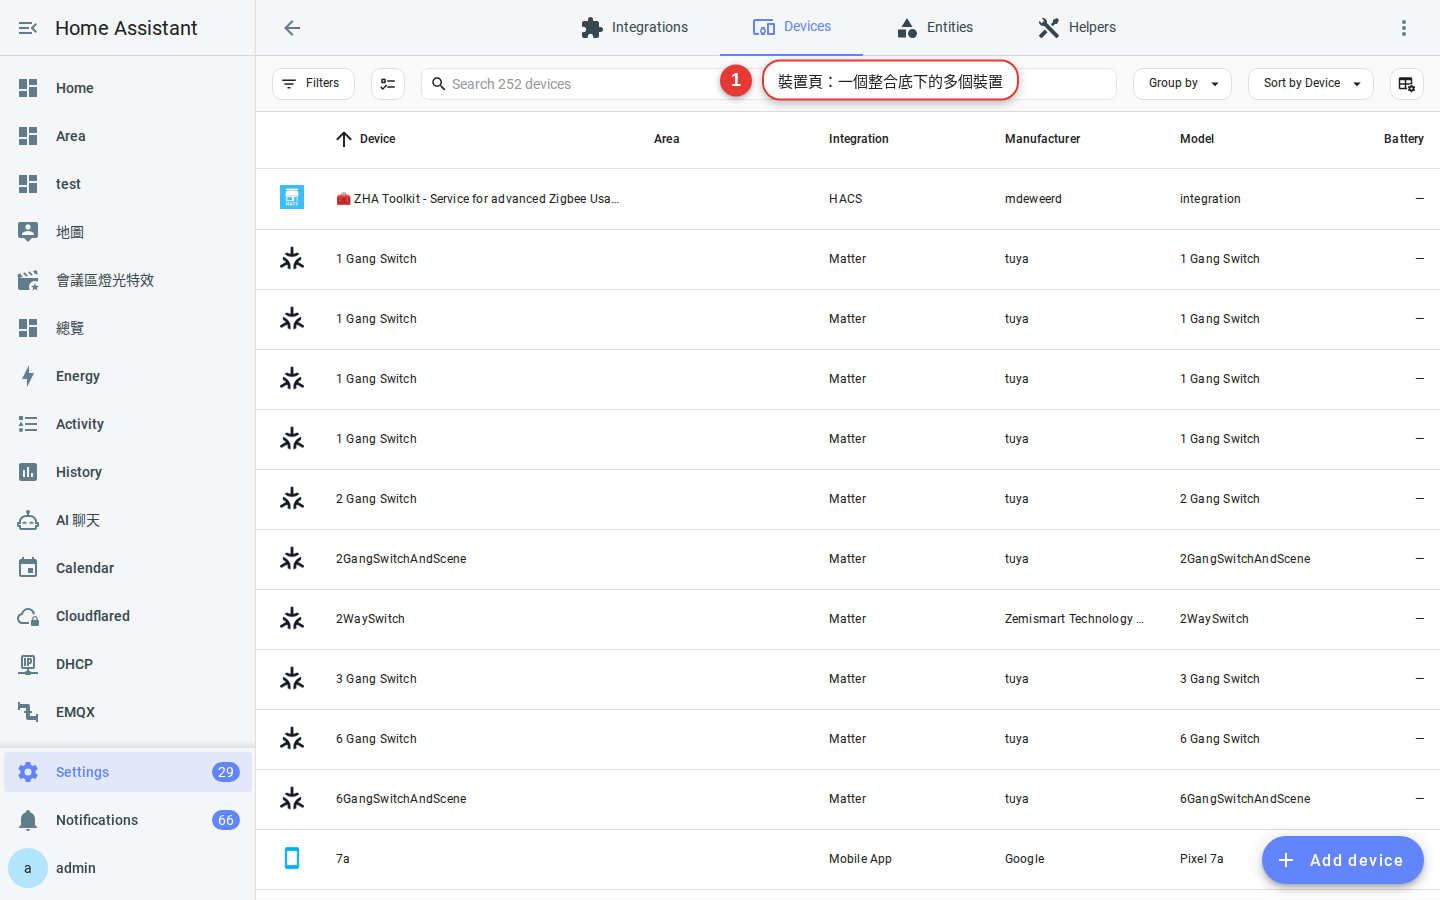
What is a config flow, and why is YAML usually unnecessary?
Older integrations often required manual edits to configuration.yaml, where a single indentation mistake could prevent Home Assistant from starting. Most integrations now use a config flow: the integration defines the questions, Home Assistant presents them as a series of forms, and the completed configuration is saved as a config entry.
Config flows can start in several ways. Recognizing them helps explain why a setup dialog sometimes appears on its own:
| Flow type | When it occurs | What you see |
|---|---|---|
| User | You select Add integration | Search for a brand, then complete a form |
| Discovery | Home Assistant detects a device through mDNS, SSDP, DHCP, or Bluetooth | A Discovered section appears at the top of the Integrations page; select Add |
| Reauthentication | A password changed, a token expired, or the provider revoked API access | The integration card shows an error and a Reauthenticate button |
| Reconfiguration | You need to change an IP address, account, or other supported setting without starting over | Reconfigure appears in the three-dot menu |
| Options | You want to adjust settings such as the update interval or which data to retrieve | Configure or Options appears on the integration card |
What do the labels in the integration documentation mean?
Official integration pages display an Integration Quality Scale rating. These labels are more than decoration: they indicate the engineering and documentation standards an integration has met.
| Label | Plain-English meaning |
|---|---|
| Bronze | Meets the baseline: UI configuration and basic documentation |
| Silver | More robust error handling and active code ownership |
| Gold | A comprehensive integration with discovery, firmware updates where applicable, and detailed documentation |
| Platinum | Meets the highest technical standards, including fully asynchronous and performance-conscious design |
| Legacy | An older integration, often configured through YAML and receiving limited maintenance |
| Custom | Community code that Home Assistant has not reviewed; you accept the additional risk, including for integrations installed through HACS |
Hands-on: add an integration from start to finish
A weather integration is an ideal first exercise: it needs no account or API key and cannot disrupt an existing device. Once you complete this flow, the rhythm will be familiar for many other integrations.
-
Confirm your home location
Weather integrations use Home Assistant’s home coordinates. Open Settings → System → Home information. If the latitude and longitude still contain default values, you may receive a forecast for the wrong country. Older releases called this page General; current documentation calls it Home information. You configured these coordinates in Chapter 2, so complete that step first if necessary.
-
Open the Integrations page
From the sidebar, open Settings → Devices & services. The page has tabs for Integrations, Devices, Entities, and Helpers, and opens on Integrations by default.
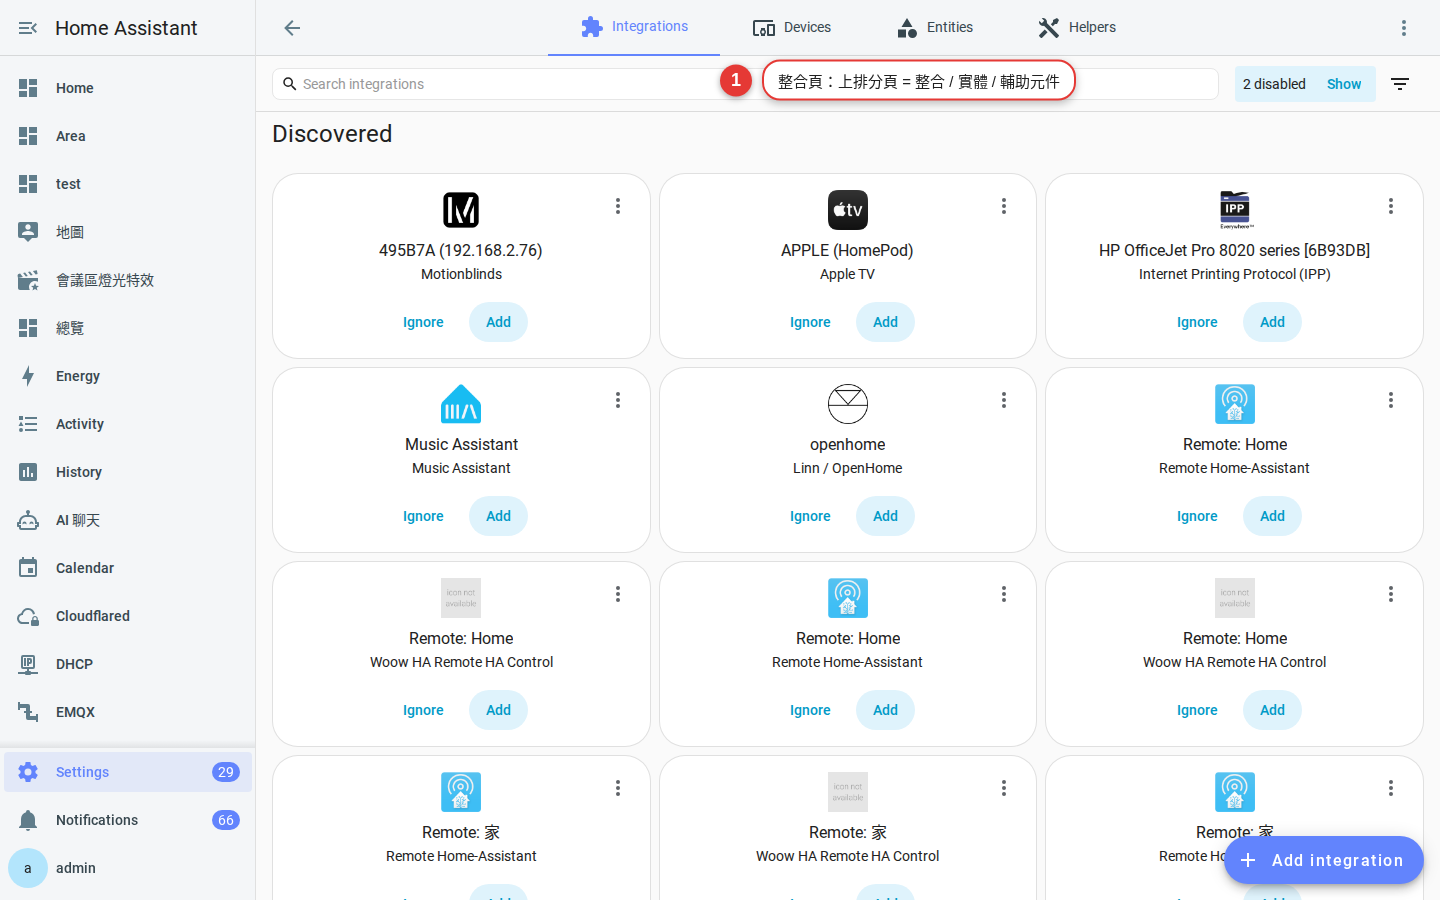
Figure 14-1 The tabs at the top lead to Integrations, Devices, Entities, and Helpers. Add integration in the lower-right corner is the main entry point. -
Check the Discovered section first
If cards appear under Discovered, Home Assistant has already found devices on your network. Selecting Add usually starts a shorter, two- or three-step setup flow, so check here before searching manually.
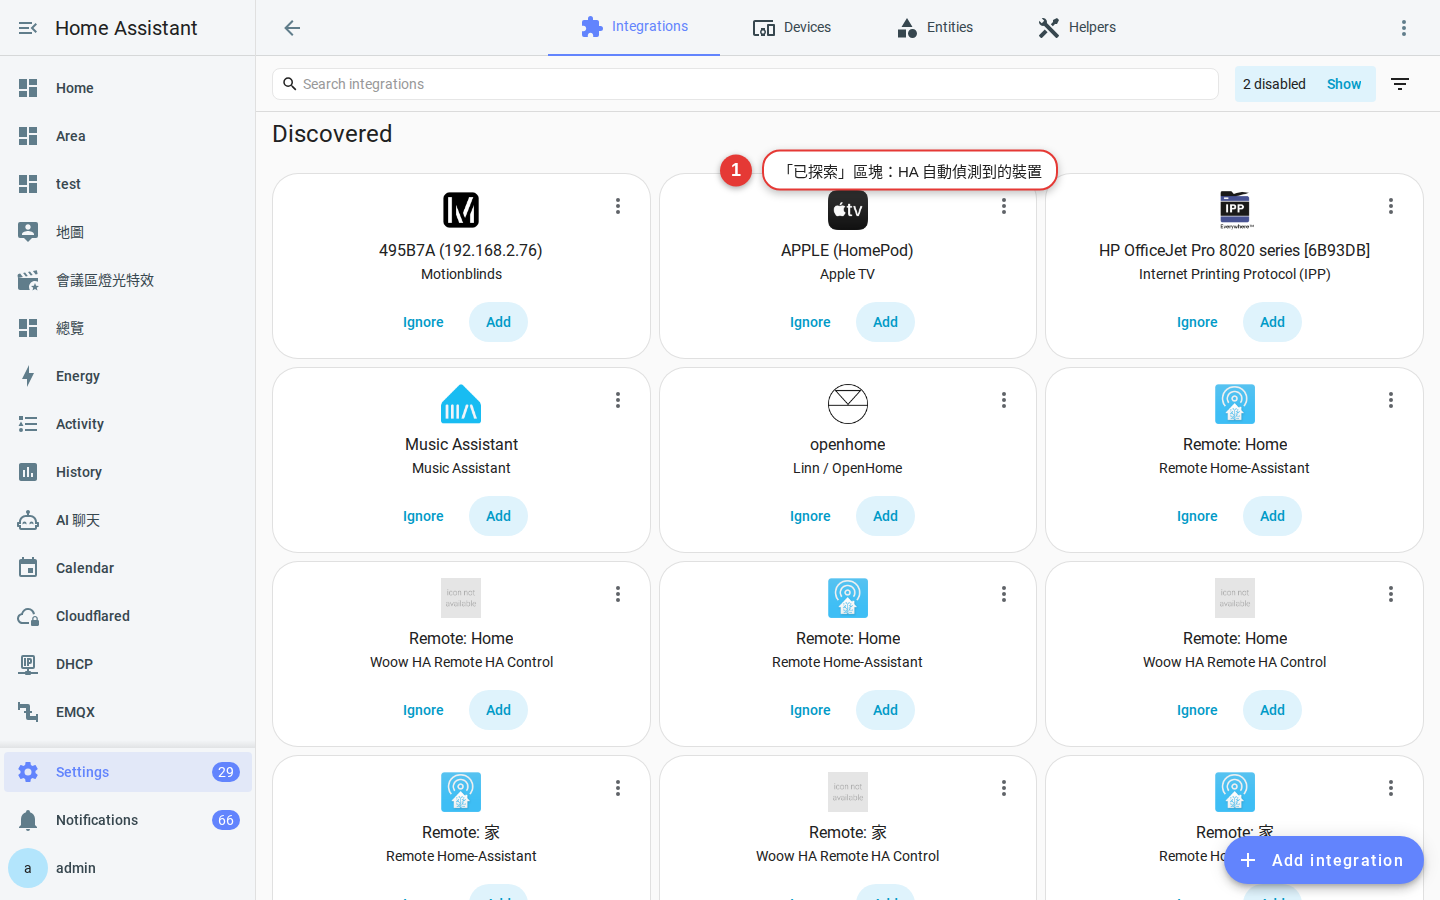
Figure 14-2 Home Assistant discovers these devices through mDNS, SSDP, DHCP, or Bluetooth. Select Add to begin setup. -
Select Add integration
Select the Add integration button in the lower-right corner. A search dialog opens.
-
Search by integration name
Enter
Open-Meteo(orMet.no). Search uses the integration’s published name, so use its English name. Select it when it appears. -
Complete the form
Open-Meteo does not require an account or API key. Choose the Zone to use as the forecast location, such as Home. Zones were configured in Chapter 5.
-
Assign an area, then finish
Home Assistant asks whether the integration belongs to an area. Weather has no physical location, so you can leave this blank. For a physical device, choosing the correct area now saves manual organization later. Select Finish.
-
Review what the integration created
The integration card displays a count such as “1 entity.” Open it to inspect the result. Open-Meteo creates one
weatherentity for each Zone and names it after that Zone. Add the entity to a dashboard as described in Chapter 6 to display a weather card.
OAuth integrations and redirect URLs
Services such as Spotify and Google Calendar use OAuth authorization instead of asking Home Assistant to collect your password. Home Assistant sends you to the provider’s sign-in page; after you approve access, the provider returns an authorization code to Home Assistant.
The provider needs to know where to send your browser afterward, so you must register a redirect URI. Private addresses such as http://192.168.1.50:8123 (or http://192.168.1.50 on the referenced newer installation) often do not meet a provider’s redirect-URI policy.
Home Assistant’s solution: My Home Assistant
Home Assistant provides the relay service my.home-assistant.io. The official instructions for many OAuth integrations tell you to register this URL in the provider’s developer console:
https://my.home-assistant.io/redirect/oauthSpotify’s documentation explicitly says to copy the URL exactly and not modify it. Google Calendar uses the same authorized redirect URL.
Your Home Assistant instance URL remains in your browser’s local storage. My Home Assistant redirects the browser to your instance; according to the official documentation, your instance URL is never sent to any external service, including My Home Assistant itself.
If My Home Assistant is disabled
Use your own Home Assistant URL followed by the fixed callback path:
<your HA URL>/auth/external/callbackYour URL must then meet the provider’s requirements, which commonly means an HTTPS domain name. This is why some OAuth integrations require remote access to be configured first. Appendix A covers Nabu Casa Cloud, self-hosted reverse proxies, and DDNS.
Creating your own client ID and secret
Some services do not permit Home Assistant to use shared credentials, so you must register an app in the provider’s developer console. Confirmed examples include:
- Spotify: Create an app in the Spotify Developer Dashboard, enable Web API, and copy the Client ID and Client Secret. Home Assistant’s documentation notes that, from February 2026, a Premium account is required to access the developer dashboard and create an app.
- Google Calendar: Create a Google Cloud project, enable the Google Calendar API, configure the OAuth consent screen, and create a Web application client.
The config flow asks for the resulting ID and secret. To replace or remove them later, open Settings → Devices & services, then select the upper-right three-dot menu → Application credentials.
Weather: Met.no, Open-Meteo, and national services
Weather data can drive useful automations: close a balcony window when rain is forecast, cool a room before the temperature exceeds 30 degrees, or remind someone to use sun protection when the UV index is high.
| Integration | API key? | Configuration | Best for |
|---|---|---|---|
| Met.no (Norwegian Meteorological Institute) | No | Name, latitude, longitude, and elevation | A straightforward built-in option with standard Home Assistant weather entities |
| Open-Meteo | No | Select a Zone | Forecasts tied to Home Assistant Zones, such as Home or Work |
| Your national weather service | Depends on the provider | Follow the provider’s API documentation | Official local terminology or more detailed regional data |
Two details about Met.no
- The integration includes an Elevation field. The official documentation notes that elevation affects temperature forecasts, especially in mountainous areas. Enter the actual elevation when you know it; for low-lying locations, a value from 0 to 50 is generally sufficient.
- You cannot configure the update interval. Home Assistant’s documentation specifies an update every 55 to 65 minutes, with randomization to distribute API load. Do not expect updates as frequently as those from an indoor temperature sensor.
Using a national weather service
Availability varies by country. Check the official Home Assistant integration catalog first. If your national provider is not listed, consider these routes:
-
Check access requirements
Consult
your-national-weather-service.exampleas a stand-in for your provider’s official site, then verify registration requirements, API credentials, data licensing, pricing, and regional availability. Do not assume access is free or worldwide. -
Route A: use a maintained community integration
Search
HACSfor your provider. Community integrations are neither maintained nor reviewed by the Home Assistant project. Before installing one, check its recent releases, open issues, and compatibility with your Home Assistant version. -
Route B: use a RESTful sensor
If the provider offers a REST API, Home Assistant’s RESTful integration can retrieve the JSON response and expose selected fields as sensors. This takes more configuration, but avoids depending on a provider-specific custom integration.
Music and media: Spotify, Apple TV, and Chromecast
All three integrations create media_player entities that use the domain actions introduced in Chapter 12. The main difference is how they connect.
| Integration | Connection method | Created entities | Main limitation |
|---|---|---|---|
| Spotify | Cloud OAuth | media_player | Requires Premium and your own Client ID and Client Secret |
| Apple TV | Local network and PIN pairing | media_player, remote, binary_sensor | Restrictive AirPlay access settings can prevent pairing |
| Google Cast | Local network with mDNS discovery | media_player | Discovery does not normally cross subnets |
Spotify
The official documentation requires a Premium account. Setup creates a media_player entity for playback control; use Source to select an available playback device.
Apple TV
During setup, Home Assistant asks you to read a PIN from the TV and enter it in Home Assistant to complete pairing. The integration creates three types of entity: media_player for playback status and control, remote for remote-control commands, and a binary_sensor that tracks keyboard focus. The last one can help trigger a phone keyboard when Apple TV displays a text field.
The official documentation lists several limitations:
- Some features, including the quick-action menu, require tvOS 14.0 or later.
- Each app decides which commands it supports. If Pause does nothing in a particular app, that app may not implement the command.
- Volume control is dependable with HomePod. HDMI CEC generally supports incremental changes only, while infrared volume control is unavailable to the integration.
- Home Assistant cannot passively determine the device’s power state; the official FAQ answers this directly with “no.”
- Turning the
remoteentity on or off changes only the power state recorded by Home Assistant; it does not physically wake or shut down the device. Do not use it as a reliable indication that the TV is on.
Google Cast (Chromecast and Google Nest speakers)
Under normal conditions, a Cast device appears under Discovered within a few minutes of starting. If it does not, check each network requirement in the official documentation:
- mDNS must work: automatic discovery depends on it, and the integration documentation lists it as mandatory.
- Devices must be on the same subnet: mDNS traffic does not cross subnets by default. Home Assistant on VLAN 10 will not automatically discover a Chromecast on VLAN 20.
- Containers need host network mode: for a Home Assistant Container installation, the official documentation requires host network mode.
- Chromecast has an unusual DNS behavior: the documentation states that it uses Google’s public DNS servers, 8.8.8.8 and 8.8.4.4, rather than the DNS server advertised by your router. A private hostname defined only on your home network may therefore fail. Media URLs, such as a NAS video or camera stream, need a direct IP address or a publicly resolvable hostname; otherwise, the display may keep loading indefinitely.
If discovery still fails, enter Known hosts in the integration options. This is a comma-separated list of hostnames or IP addresses and can bypass mDNS discovery.
cast.show_lovelace_view action, which can display a Home Assistant dashboard view on a compatible screen. Use it where a shared household status display would be useful.Location tracking: let Home Assistant know when you arrive
Location is central to context-aware automation. Without it, automations can react to time; with it, they can turn selected devices off when everyone leaves or switch on an entrance light when someone arrives. Location sources create device_tracker entities, which work with the Zone and Person entities configured in Chapter 5.
| Option | Accuracy and responsiveness | Power use | Recommendation |
|---|---|---|---|
| Companion App (official mobile app) | Usually the most responsive, with geofence triggers | Configurable | Recommended starting point |
| iCloud | Polling introduces some delay | Low; the interval adjusts automatically | Useful when an iPhone user will not install the Companion App |
| Google Maps location sharing | Polling | Low | Officially labeled Legacy; avoid it when possible |
Companion App (recommended)
Install the official Home Assistant Companion App and sign in. On first launch, it creates a device_tracker.<your_device_name> entity whose attributes include GPS coordinates, battery level, accuracy, elevation, and speed.
According to the official documentation, location reports may occur when the phone enters or leaves a Home Assistant Zone, when the app starts or performs a background fetch, when it receives a notification, and when iOS reports a significant location change. iOS creates geofences for configured Zones when the app starts; on Android, enable Zone tracking in the app settings.
unavailable, check the operating system’s permissions first.See Chapter 7 for Companion App notification and sensor details.
iCloud
During setup, do not use your main Apple Account password. The official instructions require an app-specific password generated for Home Assistant. The device must also be registered with Find My.
The integration creates a device tracker and battery sensor for each iCloud device. It also provides actions to display a message, activate Lost Mode, play a sound, and request a location update. Polling is dynamic: the interval changes according to the device’s Zone, distance from home, and battery level to reduce battery drain.
Google Maps location sharing
Home Assistant labels this integration Legacy. It is community maintained and is unlikely to gain new features, so prefer the Companion App whenever possible.
Its setup is also demanding:
- There is no UI setup flow. You must edit
configuration.yamland add itsdevice_trackersection, which is characteristic of a Legacy integration. - It requires two Google accounts: account A shares its location, and account B reads it. An account cannot share with itself.
- You must extract a Google Maps cookie from a browser manually, save it under the required filename, and place it in Home Assistant’s configuration directory. Repeat the process when the cookie expires.
Conclusion: avoid this integration if you can. Consider it only when someone will not install an app and does not use an iPhone. Never make polling-based location the sole condition for an action such as arming a security system: the reported state may lag behind the person’s actual location.
Calendars and international notifications
Google Calendar
After setup, each calendar under My calendars becomes a calendar entity. A calendar named Personal, for example, becomes calendar.personal. The integration also provides the google.create_event action, allowing an automation to create an event.
A calendar entity can trigger an automation when an event starts, ends, or a specified number of minutes before it starts. For example, tomorrow’s waste-collection event could trigger a phone reminder at 9:00 p.m. the previous evening.
Setup requires a Google Cloud project, the Google Calendar API, an OAuth consent screen, and a Web application client. Set the authorized redirect URL to https://my.home-assistant.io/redirect/oauth. Initial setup takes about 15 minutes; follow the current Home Assistant documentation step by step.
CalDAV (Nextcloud, iCloud, and Synology)
If you would rather not configure Google Cloud, CalDAV can be set up entirely through the UI: open Settings → Devices & services → Add integration, search for CalDAV, and enter the server URL, such as https://caldav.icloud.com/, along with your credentials.
Home Assistant’s documentation lists Baikal, iCloud Calendar, Nextcloud, ownCloud, and Synology Calendar as tested servers. Other RFC 4791-compliant servers may also work. For iCloud, use an app-specific password rather than your main Apple Account password.
Telegram or Slack: protect credentials before you begin
configuration.yaml.For Telegram, create a bot with BotFather, obtain the chat ID, and configure the official Telegram bot integration. For Slack, create an incoming webhook or app according to Slack’s current documentation. In either case, store the credential in secrets.yaml rather than in the main configuration file.
Once the provider is configured, call notify.send_message. In the action editor, set action to the notification action, use target with entity_id, and replace notify.family and message with values from your installation.
actions:
  - action: notify.send_message
    target:
      entity_id: notify.family
    data:
      message: "{{ msg }}"
For example, an automation could send this message when a washing cycle finishes:
actions:
  - action: notify.send_message
    target:
      entity_id: notify.family
    data:
message: "The washing cycle has finished. Remember to hang the laundry."The simplest option: Companion App notifications
If recipients use the Home Assistant Companion App, its push notifications are usually the shortest path: no separate messaging account, bot, or webhook is required.
telegram_bot.send_message can send photos, videos, files, polls, and stickers, and can edit or delete previously sent messages. When several chat IDs are allowed, use the generated notify entities with notify.send_message. Always verify the exact entity IDs and supported actions in your installation.
For household alerts, start with the Companion App notifications described in Chapter 7. Add Telegram or Slack only when it meets a specific delivery need.
Choosing between cloud and local integrations
Make this decision before buying a device rather than after installing it. The same type of light bulb can behave very differently through a local protocol and a vendor’s cloud.
| Consideration | Local integration (Zigbee, Matter, ESPHome, or LAN IP) | Cloud API integration (vendor app account) |
|---|---|---|
| During an internet outage | Continues to work as long as the local network is running | Entities become unavailable, and dependent automations stop working |
| If the vendor closes or disables its API | Unaffected | The integration stops working and the device may lose its smart functions |
| Response time | Usually under 100 milliseconds on a healthy local network | Often 0.5 to 3 seconds, depending on the internet path, provider infrastructure, and API load |
| Privacy | Control data remains within your home | Device activity and account data are processed on the provider’s servers |
| Rate limits | Usually none | Provider limits may throttle or temporarily block excessive polling |
| Setup difficulty | May require a USB coordinator or firmware installation | Often requires only a vendor account and password |
| Feature coverage | May omit a few advanced vendor-specific features | Often approaches the feature set of the vendor’s app |
Integration maintenance: diagnostics, reauthentication, reload, and removal
Setup is not the end of an integration’s life. Credentials expire, provider APIs change, and devices become unavailable. Try these recovery steps in order, from least to most disruptive.
-
1. Reload
On the integration card, select three-dot menu → Reload. This restarts only that integration, not all of Home Assistant, and usually takes about 3 seconds. Try it first after a brief network interruption or provider outage.
-
2. Reauthenticate
If the integration card shows an error saying reauthentication is required, its password or token is no longer valid. Follow the prompt and authorize it again. Your entity IDs, areas, and automations remain intact, which is the crucial difference from removing and re-adding the entry.
-
3. Download diagnostics
Open Settings → Devices & services → the integration → upper-right three-dot menu → Download diagnostics. Home Assistant downloads a JSON file containing the integration’s current state, configuration with sensitive values redacted, and retrieved data. Attach this file when opening a GitHub issue or asking for help in the forum to give maintainers the information they need. The option appears only for integrations that support diagnostics.
You can also select Enable debug logging from the same menu. Enable it, reproduce the problem once, then disable it; Home Assistant will offer the resulting log for download.
-
4. Remove only as a last resort
From the three-dot menu, select Delete. All devices and entities created by that config entry disappear immediately. Automations, scripts, and dashboard cards that refer to them will then contain broken references.
_2 appended, and break every reference. Make a backup first as described in Chapter 9.rest_command example, use the YAML tab under Settings → Tools rather than reloading a UI-configured integration. Before version 2026.8, this area was called Developer tools.HACS custom integrations: useful, but understand the risks
Home Assistant supports thousands of brands across more than a hundred categories, but some devices still lack an official integration. HACS (Home Assistant Community Store) fills part of that gap. It is not an official store; it downloads community integrations from GitHub and manages their updates. Appendix A covers installation and basic operation in detail. This section focuses on integrations.
Installation depends on your Home Assistant installation type
| Installation type | Method in the HACS documentation |
|---|---|
| Home Assistant OS / Supervised | Add https://github.com/hacs/addons as a repository, then install and start HACS under Settings → Apps |
| Container (Docker) | Enter the container and run wget -O - https://get.hacs.xyz | bash - |
| Core | Switch to the Home Assistant user and run the same command |
After downloading HACS, restart Home Assistant. Then open Settings → Devices & services → Add integration, search for HACS, and complete its setup flow. HACS needs a GitHub account for device authorization because it repeatedly checks repositories through the GitHub API. GitHub allows only 60 unauthenticated requests per hour, which is insufficient; authentication provides a much higher quota. The token requires no special access and reads only public information.
Four risks of custom integrations
- No official review: Core integrations undergo code review; HACS integrations do not. A custom integration runs with the same permissions as Home Assistant and could, in principle, do anything that process can do.
- Upgrades can break them: Home Assistant updates monthly, and internal APIs change. If a maintainer falls behind, an upgrade may break the integration or, in severe cases, prevent Home Assistant from starting normally.
- Maintainers may disappear: Projects that have not changed for two years and have unanswered issues are common. Before installing, check the most recent commit and whether maintainers respond to issues.
- Backup compatibility is not guaranteed: Custom integrations are among the components most likely to fail when you restore a backup onto a newer Home Assistant version.
A three-minute check before installation
Check stars and the latest update
Hundreds of stars and commits within the past three months are encouraging signs. A dozen stars and no activity for three years should make you reconsider.
Review the issues
Search for the latest major Home Assistant version, such as
2026.8. Check whether users report breakage and whether the maintainer responds.Back up before installing
Create a full backup first. If the integration causes a problem, a restore may take ten minutes; repairing the installation manually can take all night.
What to do when you cannot find an integration
A common frustration is finding that a new device works in its vendor app, yet its brand never appears under Add integration. Work through these checks in order.
-
Search for the brand, not the model
Home Assistant searches by brand and integration name, not every product model. A Xiaomi sensor may use
Xiaomi Miio; a branded Wi-Fi socket may use the name of its underlying platform, such as Tuya. Search the official integration catalog by brand rather than guessing repeatedly in the dialog. -
Look for protocol logos on the packaging
Check for Matter, Thread, Zigbee, Z-Wave, or Works with Home Assistant. A standards-based device may need a protocol integration rather than a brand integration—for example, Matter, ZHA, or Zigbee2MQTT. Many users search indefinitely for a brand when they should be searching for its protocol.
-
Confirm that you have the required radio
Zigbee and Z-Wave devices do not connect to Wi-Fi on their own. The Home Assistant host needs a compatible USB coordinator to communicate with them. Without one, no amount of configuration will make the device appear. Thread devices require a Thread border router.
-
Check whether the network is blocking discovery
Wi-Fi devices are commonly discovered through mDNS, SSDP, or DHCP. Confirm that the device and Home Assistant are on the same subnet, AP isolation or a guest network is not separating them, the router is not blocking multicast, and a Container installation uses host network mode. Any one of these conditions can prevent discovery.
-
Confirm that an official integration exists
Check the official integration catalog directly. If it is absent, stop searching for it in the UI. Also check whether it was removed. Home Assistant may remove an integration when a vendor closes its API or a dependency is no longer maintained; for example, version 2026.8 removed Permobil and Volvo On Call. The guide you found may predate the removal.
-
Look for a community integration in HACS
If no core integration exists, the community may provide one. Search HACS by brand, then complete the three-minute review in the previous section before installing anything.
-
Use a general-purpose interface as a last resort
If the device exposes an HTTP API, connect it with a RESTful sensor or
rest_command. If it publishes MQTT messages, use an MQTT broker. These approaches require you to build the connection yourself, but they cover many otherwise unsupported devices. -
Recognize when a device is incompatible
If a device is cloud-only, has no supported public API, and lacks a maintained community integration, Home Assistant cannot connect to it safely. Return it within the seller’s policy rather than sharing credentials or installing unknown code. Before your next purchase, search for the exact model together with “Home Assistant.”
Common problems
-
OAuth ends on a blank page or an “unable to connect” message
This is usually a redirect-URL problem. Check two things: first, register exactly
https://my.home-assistant.io/redirect/oauthas documented—even an extra trailing slash can cause a mismatch. Second, the browser completing authorization must be able to reach Home Assistant. If the instance is local-only, complete authorization in a browser on the same trusted Wi-Fi network rather than over a mobile connection. -
The integration card is red and requests reauthentication
The token expired, or you changed the service password. Select Reauthenticate rather than deleting and re-adding the integration. If reauthentication repeatedly fails, check the provider account’s Connected apps page to see whether Home Assistant’s authorization was revoked, then authorize it again if necessary.
-
The device is online, but every entity is unavailable
Reload the integration first. If that fails, download diagnostics and inspect the reported error. A cloud provider may have rate-limited your API requests, perhaps because two integrations access the same account or the polling interval is too aggressive. Disable duplicates before trying again.
-
Nothing appears under Discovered
Repeat step 4 in the previous section: confirm that the device is on the same subnet, AP isolation is off, multicast is allowed, and a Container installation uses host networking. Discovery may remain silent if any one of these conditions is missing.
-
Every automation broke after removing and re-adding an integration
The entity IDs changed; new ones often end in
_2. In the entity list, rename them to their previous IDs after confirming that the originals no longer exist, or use the batch-renaming workflow in Chapter 4. This is why you should reauthenticate instead of removing an integration whenever possible. -
An integration disappeared after a Home Assistant upgrade
Either Home Assistant removed a core integration—check that release’s notes—or a custom integration is incompatible with the new version. For a custom integration, look for an update on GitHub. If the situation is urgent, restore the pre-upgrade backup and wait for the maintainer to release a fix before upgrading again.
Frequently asked questions
Can I add the same integration more than once—for example, for two Spotify accounts?
What is the difference between reloading an integration and restarting Home Assistant?
Settings → Tools → YAML. Before version 2026.8, this area was called Developer tools.Which notification method should I use for an international deployment?
notify.send_message with the actual notify.family entity from your installation. See Chapter 7 for Companion App setup.Could a diagnostics file expose my password?
token, password, secret, email addresses, precise coordinates, and other personal data.I do not have a fixed IP address or domain. Are OAuth integrations impossible?
my.home-assistant.io, your browser carries the authorization result back to Home Assistant. Your instance URL stays in the browser’s local storage and is not sent to an external service. If you complete the flow in a browser that can reach Home Assistant on the same network, a private address will often work. Configure an external URL only if the flow still fails; see the remote-access section in Appendix A.Will Home Assistant support an integration installed through HACS?
My phone can see the Chromecast, but Home Assistant cannot
Which weather integration should I use?
your-national-weather-service.example as a placeholder for your national provider’s site and look for an API or maintained integration. Do not make critical automations depend entirely on an unreviewed community integration. Keep a standard integration as the primary source.