Add-ons and Docker architecture
An app installed from the store is a Docker container managed by Supervisor. This chapter explains images, volumes, and ports in plain English; walks you through useful Apps and off-device backups; and shows you how to diagnose failures from their logs.
Why the layer beneath Apps matters
Appendix A showed you where the app store is and how to install an app. That appendix teaches you how to use Apps; this chapter explains why they sometimes fail.
Consider a few situations you may encounter:
- You installed Home Assistant on a laptop, but there is no app store in the sidebar. You did nothing wrong: that installation type does not include it.
- You installed Zigbee2MQTT, but it will not start and its page says only “Stopped.” You do not know where to find the underlying error.
- You installed Node-RED and another web tool, but the second one refuses to start because both are trying to use the same port.
- You reinstalled the entire host, then discovered that every backup had been stored on the failed machine.
All four problems involve the same layer of knowledge: an app is a container, and containers have images, volumes, ports, and logs. By the end of this chapter, you will know where to start when any of these problems occurs.
The four installation types—and whether they include an app store
This is a major source of confusion for new users: not every Home Assistant installation includes the Apps (formerly add-ons) store. Its availability is determined by the installation type you chose; you cannot enable it later in Settings.
| Installation type | Plain-English explanation | Apps/add-ons store? | One-click updates? | Current support status |
|---|---|---|---|---|
| Home Assistant OS (HAOS) | The entire machine runs Home Assistant on the official operating system. Home Assistant Green, Home Assistant Yellow, and a Raspberry Pi flashed with the official image all use this model. | Yes | Yes | Recommended and fully supported |
| Home Assistant Container | A Home Assistant container that you run with Docker on your own Linux host or NAS, including a Synology NAS. | No | No (you must pull a new image and recreate the container yourself) | Officially supported |
| Home Assistant Supervised | A manually installed Supervisor stack on your own Debian host, intended to approximate a HAOS environment. | Yes | Yes | Deprecated; official support ended with 2025.12 |
| Home Assistant Core | Home Assistant Core running directly in a Python environment, without the surrounding management layer. | No | No | Deprecated; official support ended with 2025.12 |
The practical conclusion is simple:
- Want the Apps store? Install HAOS. You can use Home Assistant Green or Yellow, flash the official image onto a Raspberry Pi, or install HAOS on a dedicated mini PC.
- Running Home Assistant Container—for example, with Docker on a Synology NAS? There is no store, and one cannot be added. Run services such as an MQTT broker or Node-RED in separate Docker containers. The capabilities are the same, but you must deploy and maintain those containers yourself.
An app is a Docker container managed by Supervisor
The official developer documentation is explicit: Apps—the feature formerly called add-ons—are built from container images published to a container registry, such as GitHub Container Registry or Docker Hub.
When you select “Install” in the store, the following happens:
-
Supervisor downloads the image
It reads the app configuration to determine the registry, version, and image for your CPU architecture, such as arm64 or amd64. This is usually the longest step and the one most likely to fail if the network connection is interrupted.
-
Supervisor creates a container from the image
Using the app configuration, it also determines which ports to expose, which folders to mount, and whether the container needs access to a USB device.
-
Supervisor integrates the management interface into Home Assistant
This is why the app has Configuration and Log tabs inside the Home Assistant interface: you do not need to enter Docker commands yourself.
-
Supervisor keeps monitoring the container
It handles starting, stopping, updating, automatic startup at boot, and restarts by the Watchdog. These functions correspond to the controls on the app page.
Supervisor is the manager. Home Assistant Core runs in one container, each app runs in its own container, and Supervisor manages their lifecycles. This also explains why Home Assistant Container has no store: that installation type does not include Supervisor; it runs only the Home Assistant container.
Docker in plain English: a restaurant kitchen
Docker terminology can sound intimidating, but each term describes a familiar role. Think of the system as a restaurant kitchen.
| Docker term | Restaurant analogy | What it means in Home Assistant |
|---|---|---|
| Application package Image |
A read-only recipe and ingredient kit. Every kitchen using the same version starts with identical contents. | The application package downloaded from a registry. A given version of the Mosquitto image has the same contents on every compatible host. |
| Running instance Container |
A meal prepared from that kit. You can discard it and prepare another one from the unchanged recipe. | The running app. Restarting or recreating the container starts a fresh instance from its image. |
| Persistent storage Volume |
Your own storage container. Replacing the meal does not discard what you keep in it. | Persistent settings and data, such as a database or Zigbee pairing records. Updating an app does not remove data stored in its correctly mounted volume. |
| Network endpoint Port |
A numbered pickup window. Only one restaurant can use a given window number at a time. | Home Assistant normally uses port 8123, Mosquitto uses 1883, and Node-RED has its own port. If two Apps claim the same host port, the second one cannot start. |
| Automatic recovery Restart policy |
A rule that determines when the restaurant reopens after closing. | The “Start on boot” and “Watchdog” switches on an app page serve similar purposes. The official Container command uses --restart=unless-stopped: Docker restarts the container unless you deliberately stopped it. |
For Home Assistant Container, the official Docker Compose example brings these concepts together:
services:
  homeassistant:
    container_name: homeassistant
    image: "ghcr.io/home-assistant/home-assistant:stable"
    volumes:
      - /PATH_TO_YOUR_CONFIG:/config
      - /etc/localtime:/etc/localtime:ro
      - /run/dbus:/run/dbus:ro
    restart: unless-stopped
    privileged: true
    network_mode: host
    environment:
      TZ: Etc/UTC
Here, image selects the application package. volumes maps host folders on the left to paths inside the container on the right. restart defines the restart policy, and TZ sets the time zone, which should match the setting discussed in Chapter 2. network_mode: host gives the container direct access to the host network, so port 8123 is available directly on that machine.
Hands-on: install an app and understand its controls
We will use File editor for this exercise because it is lightweight, low risk, and useful later.
-
Open the store
In the lower-left corner, select Settings, then Apps (called Add-ons before 2026.2). Select Install app to open the store. In older releases, this button is labeled “ADD-ON STORE.”
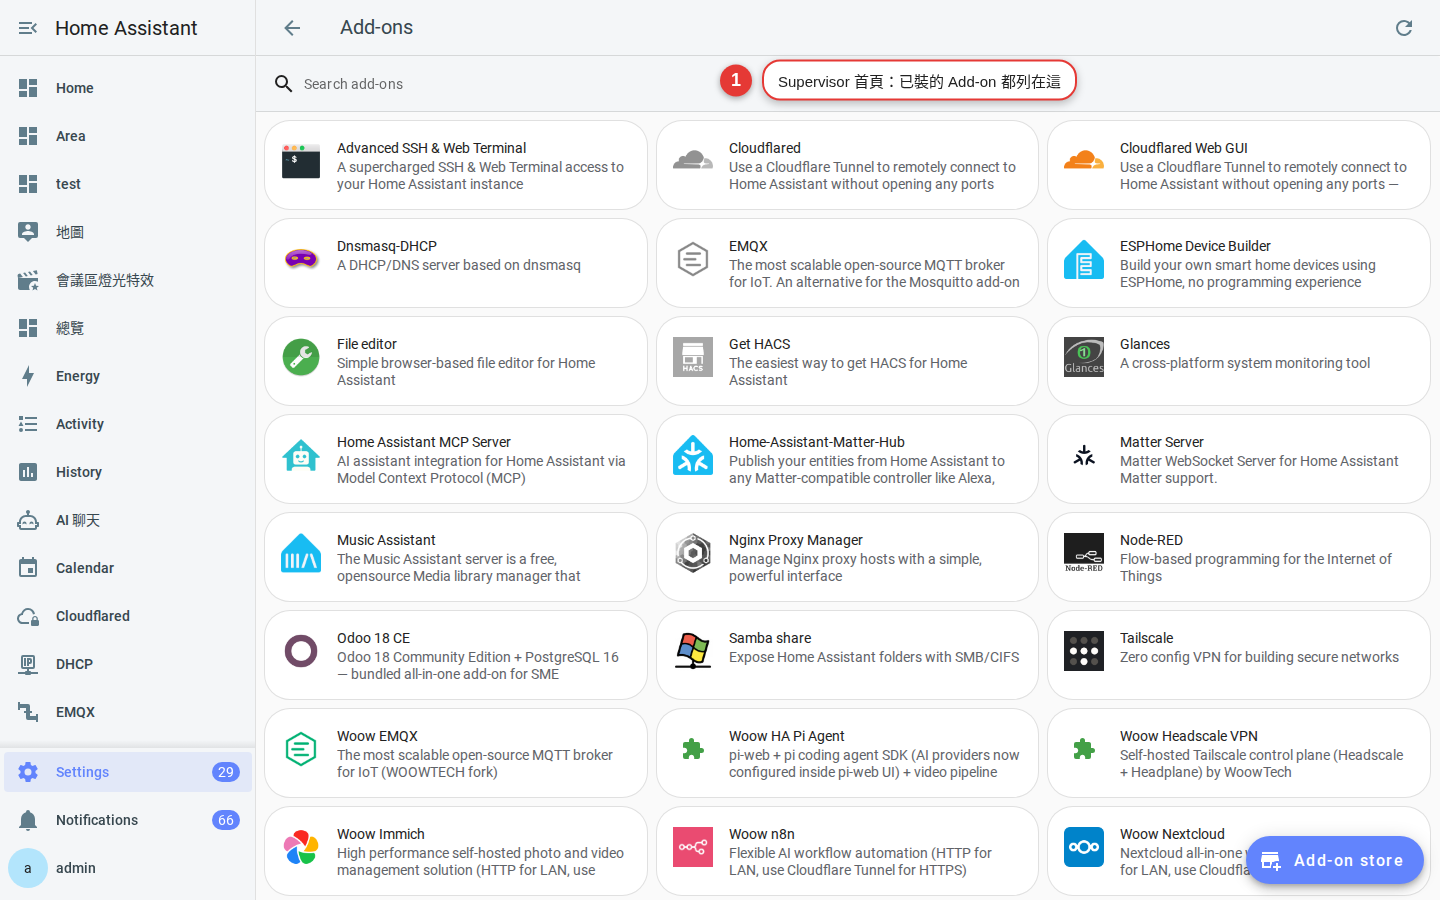
Figure 20-1 Apps home page (Supervisor): installed add-ons are listed here, and “Add-on store” in the lower-right corner opens the store. 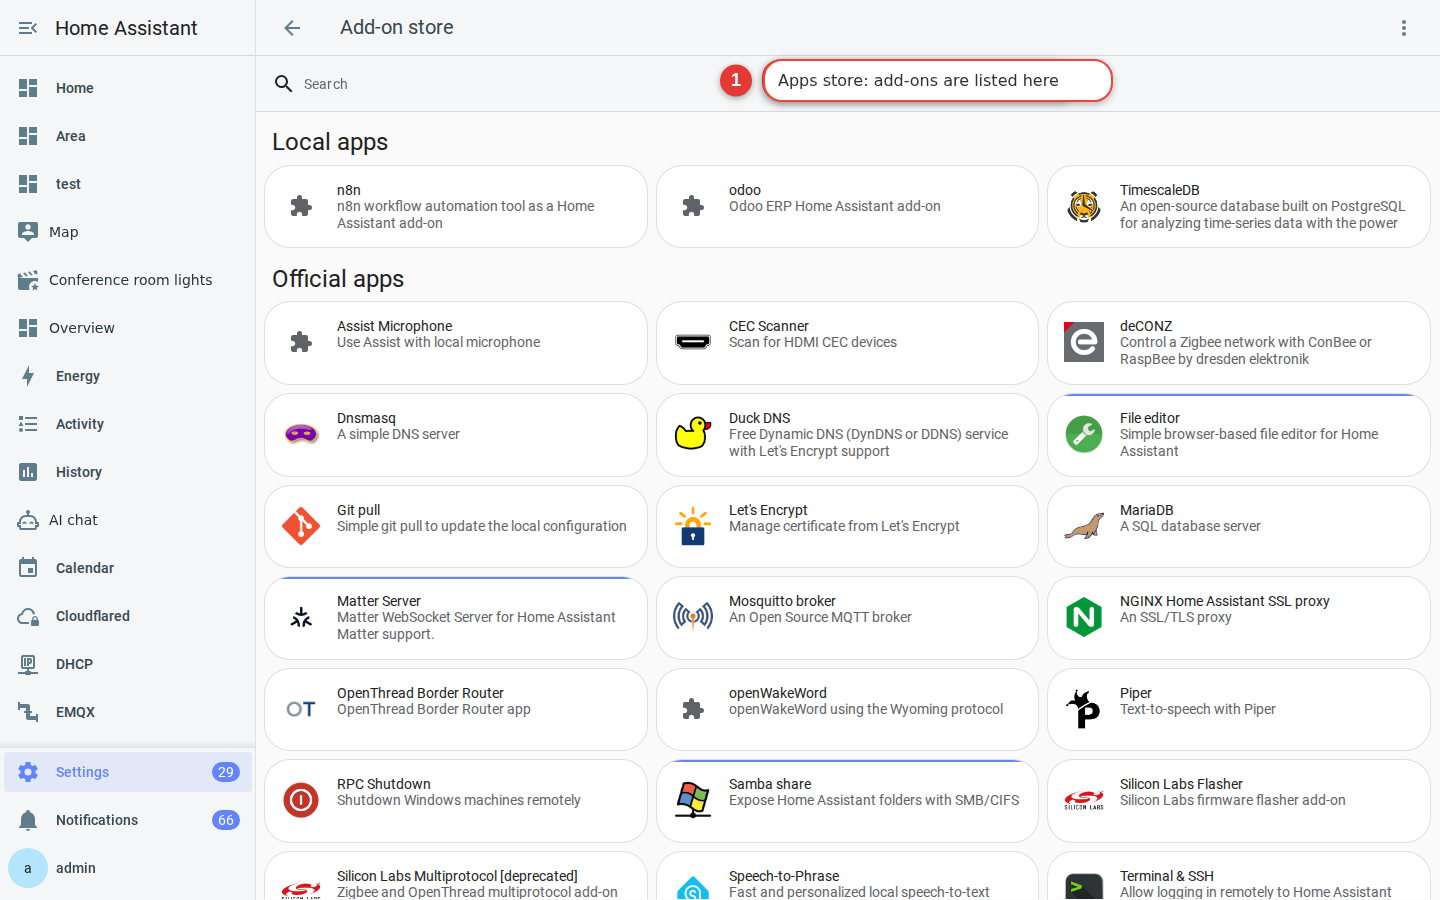
Figure 20-2 Add-on store: entries are grouped into Local apps, Official apps, and community repositories. -
Find File editor and install it
File editor is in the Official section. Open it and select Install, then wait. The first installation must download a container image; three to five minutes is normal on a Raspberry Pi. A static screen does not necessarily mean that the installation has stalled.
-
Before starting it, review the four switches
After installation, you will see Start on boot (run automatically after the host restarts), Watchdog (restart the app if it fails), Auto update (install new versions automatically), and Show in sidebar (add a shortcut to the sidebar). For File editor, enable all four.
-
Select “Start”
The status should change from “Stopped” to “Running.” If it immediately returns to “Stopped,” startup failed. Continue to the next section and inspect the log.
-
Open it from the sidebar
A File editor shortcut should now appear in the sidebar. Open it to see the
/configfolder—the persistent storage described in the previous section. Yourconfiguration.yamlfile is inside it. -
Make and reverse a small edit
This is a write-access test, not a configuration change. Change one character, save the file, and then restore the original text. Having completed this test, you will know that the editor can save changes when you need it.
configuration.yaml, confirm that the backup process described in Chapter 9 is working. A bad configuration is recoverable; having no backup is not.What each tab on an app page does
Each app page contains several tabs. Their names vary slightly by release, but their functions are largely the same:
| Tab | What it contains | When to use it |
|---|---|---|
| Info | Start, stop, and restart buttons; the version number; four switches; and an “Open Web UI” link. | Routine operation and version checks. |
| Documentation | The author's complete instructions, including the meaning of every configuration option. | Consult this first when an option is unclear. The app author's documentation is more authoritative than a generic web search. |
| Configuration | Options specific to the app. Some use form fields; others require direct YAML editing. | Set credentials, choose folders, or specify a Zigbee adapter path. |
| Network | Port mappings. The left side shows the fixed port inside the container; the right side shows the configurable port published on the host. | Change the host port here when ports conflict. Leaving the right side blank does not publish the port externally, which is the safest choice when only internal access is needed. |
| Log | Messages produced by the app since it started. | Start here whenever the app will not start, behaves unexpectedly, or cannot connect to another service. |
1881 or 8099, save, and restart. You do not need to reconfigure the other program.Troubleshoot with logs: a few markers are enough
A log can look impenetrable, but you do not need to understand every line. Follow these four steps:
-
Start at the bottom
Logs are ordered chronologically from top to bottom, so the newest entries are at the bottom. The last five to ten lines often explain a startup failure. Ignore hundreds of earlier startup messages until you need them.
-
Look for these markers
Search for
ERROR,FATAL,Traceback,Permission denied,Address already in use, andNo such file or directory. The relevant explanation is usually on or near that line. You can generally reviewWARNINGentries after resolving the errors. -
Search for the exact message
Search for the line verbatim together with the app name—for example, “zigbee2mqtt Address already in use.” Do not paraphrase the error. An exact search is far more likely to find the relevant solution.
-
Capture a clean startup if the cause is still unclear
Stop the app, refresh the log page, and select Start while watching the output. This captures one clean startup and is much easier to interpret than thousands of old messages.
Use this quick reference for common messages:
| Log message | Plain-English meaning | What to check |
|---|---|---|
Address already in use | Another service is already using this host port. | Change the published port on the Network tab. |
Permission denied | The app is not allowed to access a file or device. | The USB device path may be wrong, or the configured folder may not exist. |
Connection refused | The destination service is not accepting connections. | A required app—often the MQTT broker—may not be running. |
No such file or directory | The specified file or device cannot be found. | Check the configured path for typographical errors. |
No space left on device | Storage is full. | See “Storage is full” under Troubleshooting. |
A tour of useful Apps
Do not install everything. Choose only what serves a specific need. In the Source column, Official means the app is included in the store by default; Community means that you must first add a third-party repository, as explained in the next section.
| App | Source | What it does | Who should install it |
|---|---|---|---|
| File editor Browser-based editor |
Official | Opens files under /config directly in a browser and provides syntax checking. |
Almost everyone. It is lightweight, straightforward, and useful in an emergency. |
| Studio Code Server | Community (hassio-addons) |
Provides a complete VS Code environment in the browser, with Home Assistant and YAML extensions that can complete entity names. | People who write substantial amounts of YAML. It is much more capable than File editor, but also much more resource intensive. |
| Terminal & SSH | Official | Provides a browser-based terminal, remote SSH access, and the Home Assistant CLI. | Anyone who needs a command line. You must enable Advanced Mode on your profile page before you can see it. |
| Mosquitto broker | Official | Runs an MQTT message broker through which many devices and tools communicate. | Anyone using Zigbee2MQTT, Tasmota, or more advanced ESPHome setups. |
| Zigbee2MQTT | Community (maintained by the official Z2M team) |
Controls a Zigbee coordinator (the USB adapter) and translates Zigbee device traffic into MQTT messages. It supports more device models than the built-in option. | People with many Zigbee devices or less common brands. Install Mosquitto first. |
| Node-RED | Community (hassio-addons) |
Creates automation flows visually by connecting nodes instead of writing YAML. | People with complex automation logic or a visual approach to problem solving. Built-in automations are sufficient for simpler tasks. |
| Samba share | Official | Exposes folders such as config, backup, media, and share as network shares for drag-and-drop access from Windows or macOS. |
People who prefer a desktop editor or want to copy backups to another computer. |
| Advanced SSH & Web Terminal | Community (hassio-addons) |
Adds capabilities beyond the official Terminal & SSH app, including the ability to disable Protection mode. | Advanced users who understand the additional access they are granting. Beginners should use the official app. |
addons and addon_configs folders are now named local_apps and app_configs. The old names remain available for compatibility, so either form may appear in documentation.Add a third-party repository for Apps not in the default store
The store initially contains only the official selection. To install Apps such as Node-RED, Studio Code Server, or Zigbee2MQTT, first add their repository; the store will then display the Apps that repository provides.
-
Copy the repository URL
Two commonly used repositories are the community Apps collection at
https://github.com/hassio-addons/repositoryand the official Zigbee2MQTT repository athttps://github.com/zigbee2mqtt/hassio-zigbee2mqtt. -
Open the store
Go to Settings → Apps, then select Install app.
-
Open “Repositories” from the three-dot menu
On the store page, open the three-dot menu in the upper-right corner and select Repositories. Older releases may show a translated label for the same command.
-
Paste the URL, select Add, and refresh
The store will gain one or more sections. If the new Apps do not appear, press Ctrl + F5 to force a refresh. If they are still missing, go to Settings → System → Logs and select Supervisor in the upper-right corner. Its log will reveal whether the repository URL is invalid.
Send backups off-device automatically
Chapter 9 explains how to create and schedule backups, how many to retain, and why local-only storage is inadequate. This section does not repeat those details.
This section expands on one point from Chapter 9: cloud backup destinations are now built in, so you do not need an app. This function once required a third-party add-on. The backup page now lets you select multiple Locations and send each backup to all of them automatically. The important differences—especially the restrictions—are summarized below.
| Backup location | How to enable it | Cost | Limitations |
|---|---|---|---|
| Home Assistant Cloud (Nabu Casa) | If you subscribe, enable it directly in the backup settings. | Requires a Cloud subscription, but backup storage has no additional charge. | Only the latest backup is retained; the previous one is deleted automatically. A single file cannot exceed 5GB. |
| Google Drive | Settings → Devices & services → Add integration → Google Drive | Free, using your own Drive storage. | You must obtain OAuth credentials from Google Cloud; the process has several steps. |
| Microsoft OneDrive | Settings → Devices & services → Add integration → OneDrive | Free, using your own OneDrive storage. | Requires a personal OneDrive account. When using the default credentials, the my and cloud integrations must be enabled. |
| Network storage (NAS) | Under Settings → System → Storage, add network storage and make it available for backups. | Free if you already own a NAS. | A backup fails if the NAS is offline. A NAS in the same building as the Home Assistant host is vulnerable to the same fire or flood. |
Connect a cloud or network destination in three steps:
-
Connect the destination
Home Assistant Cloud is already available if you have a Nabu Casa subscription. Otherwise, go to Settings → Devices & services → Add integration, add Google Drive or OneDrive, and follow the account authorization process. For a home NAS, use Settings → System → Storage instead; add network storage and make it available for backups.
-
Enable the destination on the Backups page
Go to Settings → System → Backups and enable the new destination under Locations in the automatic-backup settings. Configure the schedule and retention as described in Chapter 9. Keep the local
/backupdestination enabled as well. A local copy restores quickly; the remote copy protects you if the entire host fails. -
Run one backup manually and verify it at the destination
Do not skip this step: an unverified backup is not a reliable backup. Open Google Drive or OneDrive and confirm that the file exists. If a Home Assistant Cloud upload exceeds the 5GB limit, return to the backup settings and exclude the media folder. It is often the largest component and offers the greatest reduction.
Managing resource use on lower-end hardware
Every app is a real, continuously running program that consumes CPU time, memory, and storage. A Raspberry Pi 4 with 2GB of memory or an older mini PC may slow down as Apps accumulate: pages load more slowly, automations are delayed, and updates fail. Home Assistant does not publish resource figures for every app, so the table below is a relative guide for prioritization, not a benchmark.
| App type | Relative resource use | Advice for lower-end hardware |
|---|---|---|
| File editor, Samba, Terminal & SSH | Very low; usually imperceptible | Install as needed. |
| Mosquitto broker | Low | Generally suitable; it is efficient. |
| Zigbee2MQTT | Moderate; runs continuously | Worth installing when needed, but avoid combining it with many resource-intensive Apps. |
| Node-RED | Moderate to high, particularly in memory use | Think carefully on systems with less than 2GB of memory. Use built-in automations for simple tasks. |
| Studio Code Server | High, especially while its web interface is open | Use File editor instead on lower-end systems. |
| Databases and analytics, such as MariaDB, Grafana, and InfluxDB | Very high, with frequent storage writes | Not recommended on a Raspberry Pi with an SD card. Write wear can cause real SD card failures. |
| Speech processing, such as Whisper and Piper | Very high, particularly in CPU use | Requires more capable hardware; performance on a Raspberry Pi may be impractically slow. |
Follow these practical principles:
- Remove Apps you do not use; do not merely stop them. A stopped app still occupies storage.
- Install only one new app at a time. Observe it for a day or two before installing the next one, so that you can identify the cause if problems begin.
- Boot a Raspberry Pi from an SSD or other USB storage, not an SD card. Repeated writes are a leading cause of SD card failure, and database Apps write frequently.
- Check whether a built-in feature already meets the need. Installing Node-RED only to turn on a light at sunset is unnecessary; the built-in automation editor handles that task easily (see Chapter 8).
Common problems and how to diagnose them
-
The Apps store is missing
First identify your installation type. Go to Settings → System → Repairs, then open the three-dot menu → System information. The Installation type field will identify OS or Container. Container and Core installations do not include the store by design; it cannot be enabled. To gain the store, reinstall with HAOS after creating and verifying a backup, then restore that backup. If you use HAOS but cannot find a particular app, such as Terminal & SSH, Advanced Mode may be disabled. Select your name in the lower-left corner to open your profile, then enable Advanced Mode.
-
An app is stuck installing or installation fails
In roughly 90% of cases, the cause is a failed container-image download. Check these items in order: (1) Can Home Assistant reach the internet? (2) Is storage available under Settings → System → Storage? (3) Does the app publish an image for your CPU architecture? Less common Apps may provide only amd64 images and therefore cannot run on a Raspberry Pi; the error will usually say that no image was found. Retry once, because the first download may simply have been interrupted.
-
A port conflict prevents the second app from starting
The log shows
Address already in useorport is already allocated. On the affected app's Network tab, change the right-hand field to an unused host port—for example, from 1880 to 1881—then save and restart. Use the new port in the URL as well. If no external client needs to connect, leave the right-hand field blank instead; the conflict disappears because the port is not published on the host. -
An app no longer starts after an update
Read the last few lines of its log. The author may state that the configuration format changed and identify the option to update. If the required change is unclear, the fastest recovery is to restore the pre-update backup described in Chapter 9. This is why you should enable automatic backup before updates. Also check Settings → System → Repairs, where breaking changes may generate an explanatory notice.
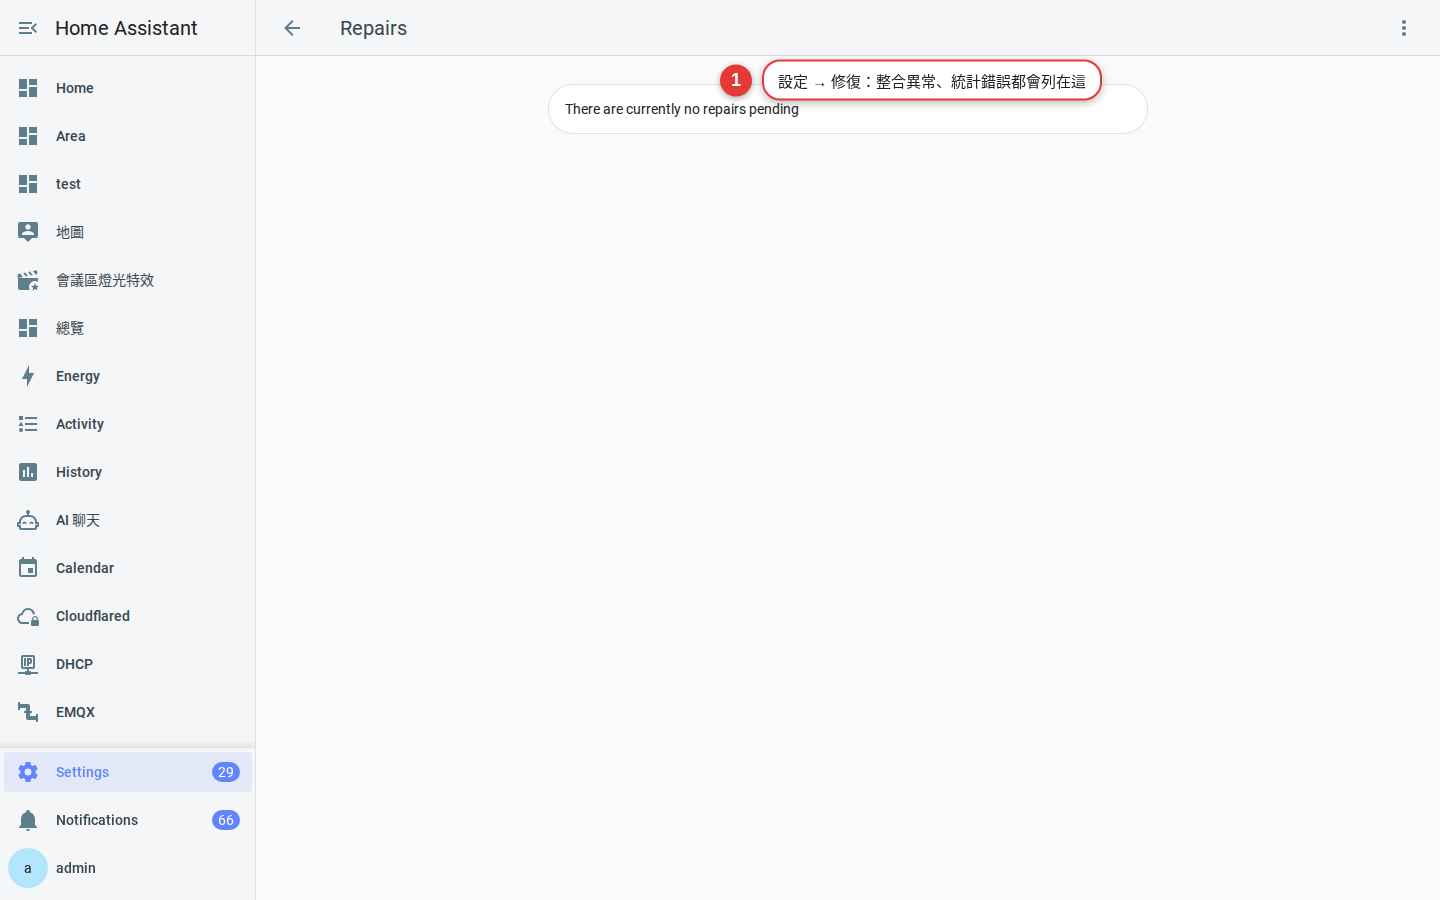
Figure 20-3 Settings → Repairs: integration failures, statistics errors, and breaking changes appear here. When nothing requires attention, the page displays “No repairs pending.” -
Storage is full
Full storage causes many apparently unrelated failures, and the log contains
No space left on device. Clean up in this order: (1) Delete old backups, which are usually the largest files. (2) Remove—not merely stop—unused Apps. (3) Check themediaandsharefolders for accumulated recordings. (4) If the database is too large, reduce the Recorder retention period. If the first three steps do not free enough space, move to a larger storage device. -
An app keeps restarting
If the status alternates between “Running” and “Stopped,” the Watchdog is probably restarting an app that continues to fail. Turn off Watchdog temporarily and let the app remain stopped so that you can read the complete error. Re-enable Watchdog after resolving the cause.
-
Zigbee2MQTT cannot find the USB adapter
The log commonly shows
No such file or directory. Go to Settings → System → Hardware, then select three-dot menu → All Hardware. Find the connected adapter and copy its path into the Zigbee2MQTT configuration. Do not copy a device path from an online tutorial; every host differs. Prefer the stable, long path beginning with/dev/serial/by-id/instead of a short path such as/dev/ttyUSB0. A short path can change when devices are reconnected or the host restarts, while the by-id path identifies the adapter itself.
Frequently asked questions
Is it called an add-on or an app?
I run Home Assistant in Docker on a Synology NAS. Can I add the Apps store?
Will updating an app erase my configuration?
My backup is in Google Drive. Should I keep the local copy?
Must I install Mosquitto before Zigbee2MQTT?
Connection refused messages.