To-do lists and calendars
Move reminders such as “Take out the trash,” “Pay this month’s service charge,” and “Clean the air-conditioning filter” out of your head and into Home Assistant. Build shared to-do lists and local calendars, then let calendar events turn on lights, send notifications, and create to-do items automatically.
Why this matters
Your household reminders may be scattered among sticky notes on the refrigerator, notes on your phone, and bills left by the door. Three places, three sets of information—and eventually everyone forgets.
Home Assistant includes two tools that can bring this information together:
- To-do list: a collection of things that need doing. You can mark items complete and assign due dates. A shopping list is one type of to-do list.
- Calendar: events with specific dates or times, such as trash collection, a meeting, or a payment due next Wednesday.
The greatest benefit is not simply that you can see them: lists and calendars can provide input for automations. If the calendar says “Take out the trash” at 19:30, Home Assistant can turn on the entryway light and notify your phone at 19:10. When someone adds an item to a to-do list, it can notify the whole household—something a paper sticky note can never do.
By the end of this chapter, you will have a shared household shopping list, a local calendar, at least three automations driven by calendar events, and a dashboard view showing what needs to be done today.
To-do lists vs. calendars: which should you use?
People often put “Take out the trash” on a to-do list and then wonder why it does not send a reminder. The distinction is simple: Does this task need to happen at a specific time?
| Question | To-do list (todo) | Calendar (calendar) |
|---|---|---|
| Core information | Individual items, either complete or incomplete | Individual events with start and end times |
| Time | Can have a due date, but does not inherently represent an exact time | Time is central, with minute-level precision |
| Entity state | A number: the current count of incomplete items |
on (an event is currently in progress) or off
|
| Typical content | Buy soy sauce, replace a filter, pay the water bill | Trash collection at 19:30, a meeting from 14:00–15:00, a chore rotation |
| How it triggers an automation | When an item is added, completed, or removed | When an event starts or ends, with an optional offset |
One more term needs clarification: a domain. Home Assistant groups entities by type into domains such as light, switch, and sensor. The to-do list domain is todo; the calendar domain is calendar. You will therefore see entity IDs such as todo.shopping_list and calendar.trash_day. See the domain reference in Chapter 12.
todo.family_chores, is an example. Home Assistant generates the actual ID from the name you enter, and a name in a non-Latin script may produce a very different ID. Before you begin, copy the real ID from Settings → Tools → States (this sidebar area was called “Developer tools” before 2026.8). See Chapter 4 for naming and entity ID conventions.Hands-on 1: Create your first local to-do list
We will use the Local To-do integration. “Local” means the data stays entirely within your Home Assistant installation. It does not go to the cloud, remains available without internet access, and is included in the backups described in Chapter 9.
-
Open the integrations page
In the left sidebar, select Settings → Devices & services. Make sure that the Integrations tab is selected.
-
Add the integration
Select + Add integration in the lower-right corner. Search for “Local” or “To-do,” then choose Local to-do. This integration was added in Home Assistant 2023.11, so older versions will not list it.
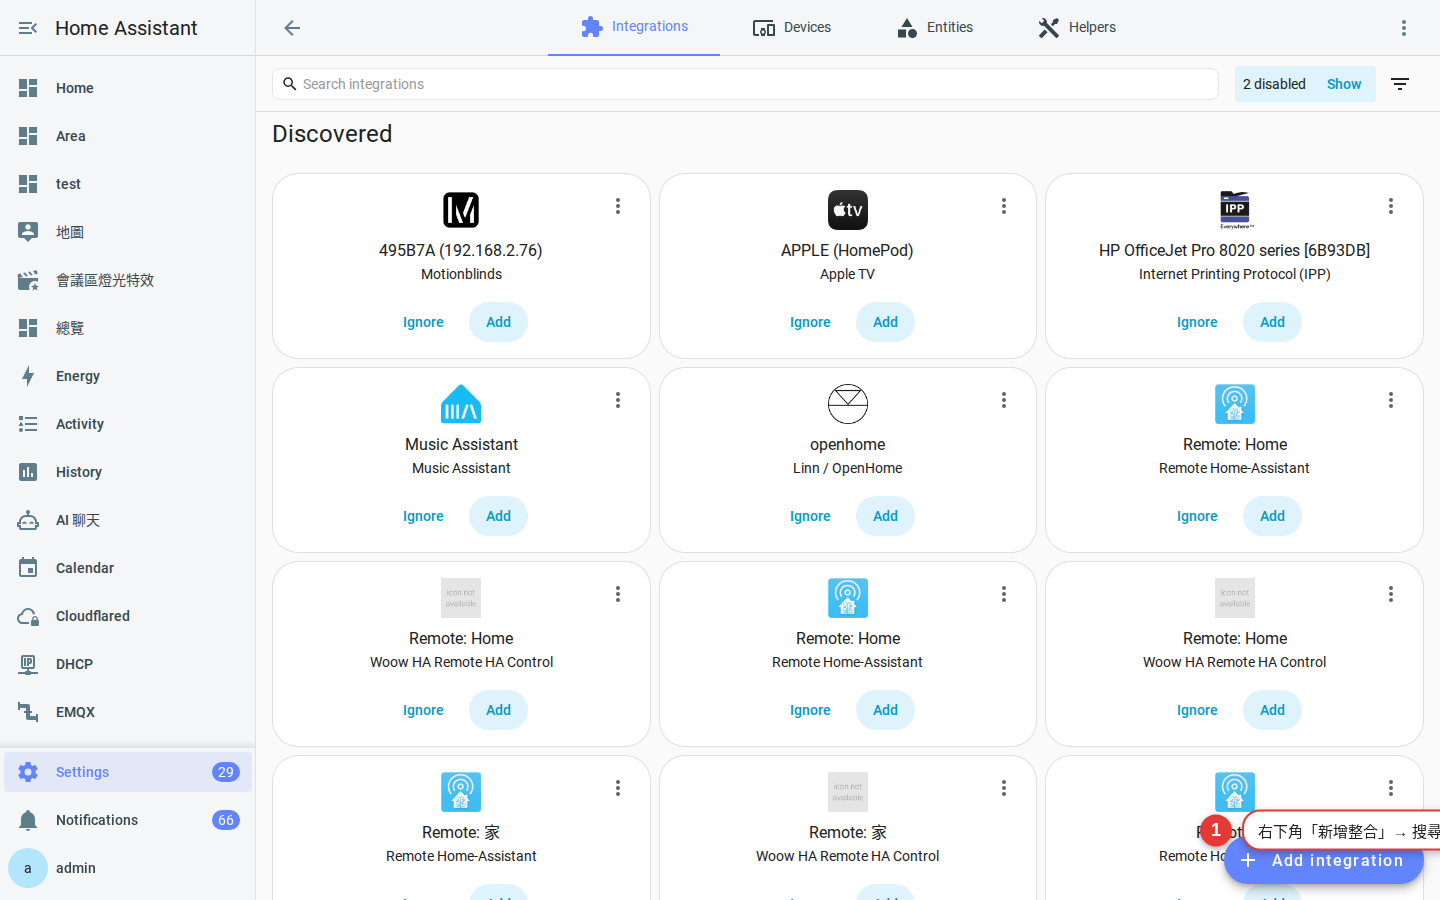
Figure 16-1 Open Settings → Devices & services, select Add integration in the lower-right corner, and search for Local To-do. -
Name the list
The setup form asks for only one field: the list name. Enter “Household chores” or “Shopping,” then select Submit to create the list.
-
Create additional lists as needed
Local To-do creates one list at a time. To create separate “Household chores,” “Shopping,” and “Requests from family” lists, repeat steps 2–3 three times. Each list becomes an independent
todo.entity. -
Open the To-do lists panel
After you create a list, a dedicated To-do lists panel appears in the Home Assistant sidebar. Open it to add items, mark them complete, and assign due dates. This panel is built in; you do not need to create a dashboard.
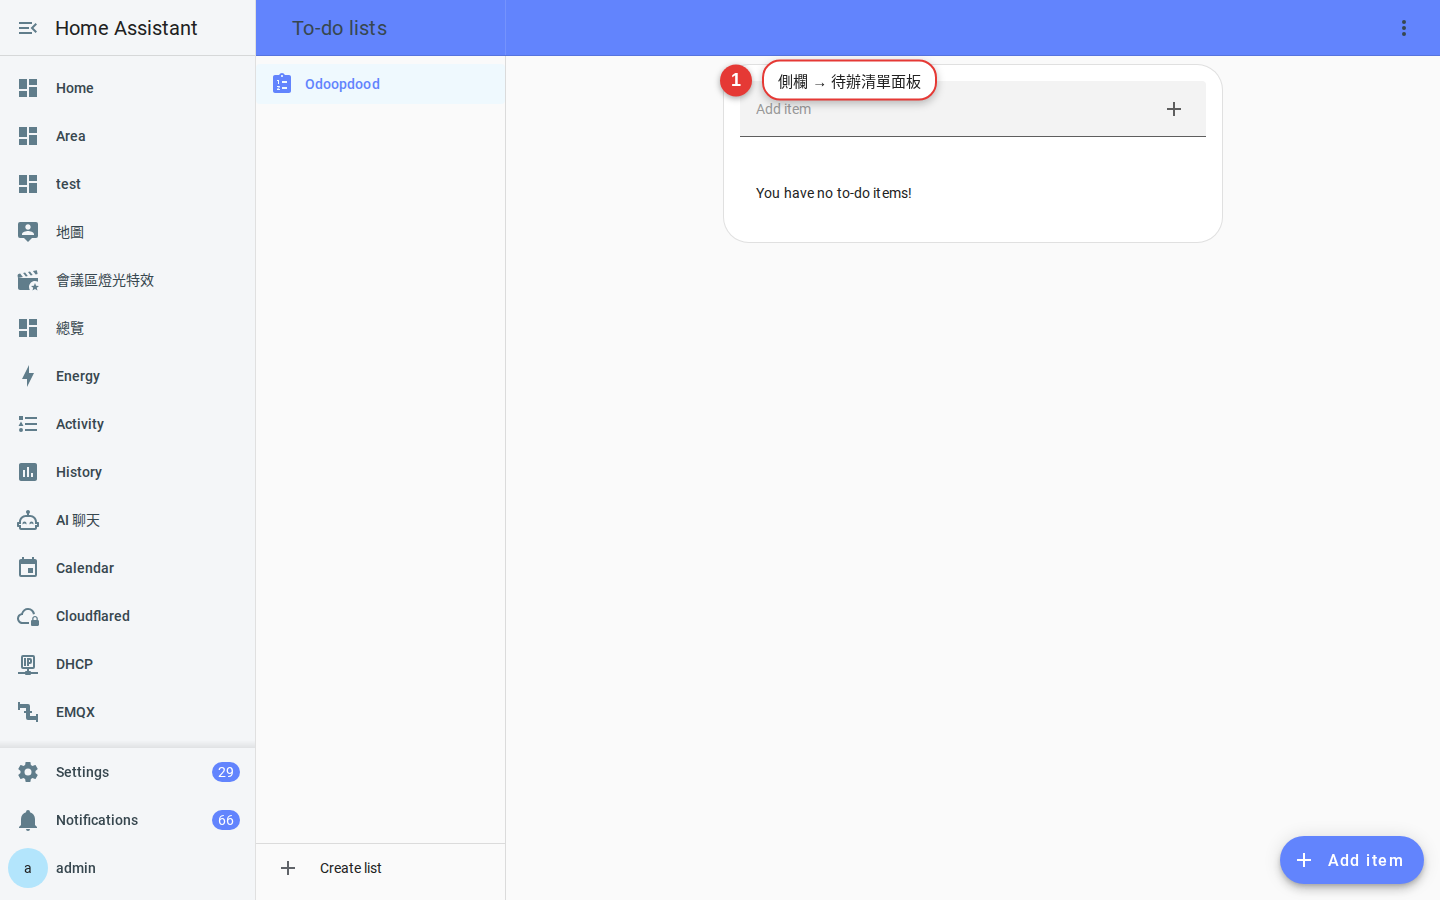
Figure 16-2 The sidebar’s To-do lists panel shows every list on the left. On the right, type to add an item or select its checkbox to mark it complete. -
Confirm entity ID
Open Settings → Tools → States and filter for
todo.. The list you just created will appear. The number in its state field is the current count of incomplete items. Copy the entity ID for use in later automations.
Which shopping-list integration should you use?
Home Assistant also provides a Shopping list integration, which predates Local To-do by many years. New users often ask how they differ and which one to use.
| Shopping list | Local to-do | |
|---|---|---|
| Number of lists | One fixed shopping list | Create as many separate lists as needed |
| Due date | No | Yes |
| Voice assistant | The official documentation explicitly supports commands such as “Add eggs to my shopping list” | Voice support depends on your voice assistant settings |
| Dedicated actions | Includes a full set of legacy shopping_list.* actions |
No dedicated actions; uses the general todo.* actions
|
General todo.* actions |
Supported because it is also a to-do entity | Supported |
Both integrations remain in the official documentation, and neither is marked as deprecated. Choose as follows:
- You only need one grocery list and want to say “Add soy sauce to my shopping list” → install Shopping list.
- You need multiple lists, due dates, or more sophisticated automations → use Local To-do.
- You can install both; they do not interfere with each other.
Shopping list has its own set of actions. They are listed here so that you can understand older tutorials, but use the todo.* actions in the next section for new automations, because they work with every to-do-list integration:
shopping_list.add_item
shopping_list.complete_item
shopping_list.incomplete_item
shopping_list.remove_item
shopping_list.complete_all
shopping_list.incomplete_all
shopping_list.clear_completed_items
shopping_list.sorttodo.. You can place it on a To-do list card and call todo.add_item against it. It is a to-do list with an additional set of legacy, dedicated actions.Quick reference for actions in the todo domain
First, note an important terminology change. Home Assistant formerly used “service” and the YAML key service:. It now uses “action” and the YAML key action:. Tutorials that show service: todo.add_item use the old syntax.
| Action | Purpose | Main parameters |
|---|---|---|
todo.add_item |
Add a new item |
item (required), due_date, due_datetime, description
|
todo.update_item |
Modify an item: rename it, mark it complete, or change its due date |
item (required; name or UID), rename, status, due_date, due_datetime, description
|
todo.remove_item |
Remove an item from the list | item |
todo.get_items |
Return the list contents for use in later steps |
status, used with response_variable
|
todo.remove_completed_items |
Clear all completed items at once | Specify the list only; there are no other parameters |
Add an item
action: todo.add_item
target:
  entity_id: todo.family_chores
data:
  item: Replace the living-room AC filter
  due_date: "2026-09-01"
description: Remove it, rinse it with water, let it air-dry for a day, and reinstall it.due_date (a date only, such as 2026-09-01) and due_datetime (a date and time, such as 2026-09-01 23:00:00) are mutually exclusive. Specifying both causes an error. Due dates and descriptions are not supported by every list integration; use these fields only when the provider supports them.Mark an item complete
action: todo.update_item
target:
  entity_id: todo.family_chores
data:
  item: Replace the living-room AC filter
  status: completed
status accepts needs_action or completed. To reopen a completed item, set status to needs_action.
item identifies an item by name. If the list contains two items with the same name, Home Assistant cannot tell which one to update. Use the item’s UID instead: retrieve this unique identifier with todo.get_items.Read list contents
Unlike the other actions, this one returns data. Use response_variable to store its response for later steps:
action: todo.get_items
target:
  entity_id: todo.family_chores
data:
  status: needs_action
response_variable: my_items
If omitted, status defaults to needs_action. To retrieve both states, use [needs_action, completed]. The response has this structure:
todo.family_chores:
  items:
    - summary: Replace the living-room AC filter
      uid: "01244b28-e604-11ee-a0a4-e45f0197c057"
      status: needs_action
      due: "2026-09-01"
      description: Remove and rinse it with water
    - summary: Pay the building management fee
      uid: "ae993df4-e604-11ee-a0a4-e45f0197c057"
      status: needs_action
Note the field names for each item: summary (not item), uid, and status, plus the two optional fields due (the due date) and description.
due field. The payment example below first uses selectattr('due', 'defined') to discard items without that field.Use changes to a to-do list as triggers
Newer Home Assistant versions provide three todo triggers in the automation editor:
| Trigger | When it fires | Example use |
|---|---|---|
todo.item_added |
A new item is added to the list | Notify the household when someone adds an item to the shopping list |
todo.item_completed |
An item is marked complete | Notify a parent when a child marks “Take out the trash” complete |
todo.item_removed |
An item is removed | Audit when items are deleted |
The YAML differs from a standard trigger: it uses target: rather than placing entity_id: directly under the trigger:
alias: Notify when an item is added to the shopping list
triggers:
  - trigger: todo.item_added
    target:
      entity_id: todo.shopping_list
actions:
  - action: notify.mobile_app_my_phone
    data:
      title: Shopping list updated
      message: Someone added an item. Remember to check the list before you go out.
The trigger data includes the list’s entity_id and the affected item identifiers in item_ids. To retrieve the item names, you usually need to call todo.get_items again in the action sequence.
todo. entity. Because that state is the number of incomplete items, adding an item increases it by 1.Hands-on 2: Create a local calendar
Next, create a calendar. Like Local To-do, the official Local Calendar integration runs entirely on your Home Assistant system. Added in Home Assistant 2022.12, it stores data in your configuration directory and requires no account or cloud service.
-
Add the integration
Open Settings → Devices & services → + Add integration, then search for Local calendar.
-
Pick a calendar name
Follow the prompts to enter a name. Create a separate calendar for each purpose, such as trash collection, chore rotation, bills, and maintenance, rather than putting everything in one. The next step explains why.
-
Why separate them: triggers apply to an entire calendar
A calendar trigger fires when any event in that calendar begins; the trigger itself cannot select events whose titles contain a particular word. Separate calendars keep automations simple. If you do use one calendar for several purposes, add a condition that checks
trigger.calendar_event.summary. -
Add events from the Calendar panel
After setup, open the Calendar panel in the sidebar. Select a day to add an all-day or timed event, and optionally configure it to repeat weekly, monthly, or on another schedule. For a fixed weekly event such as trash collection, one recurring event can cover the entire year.
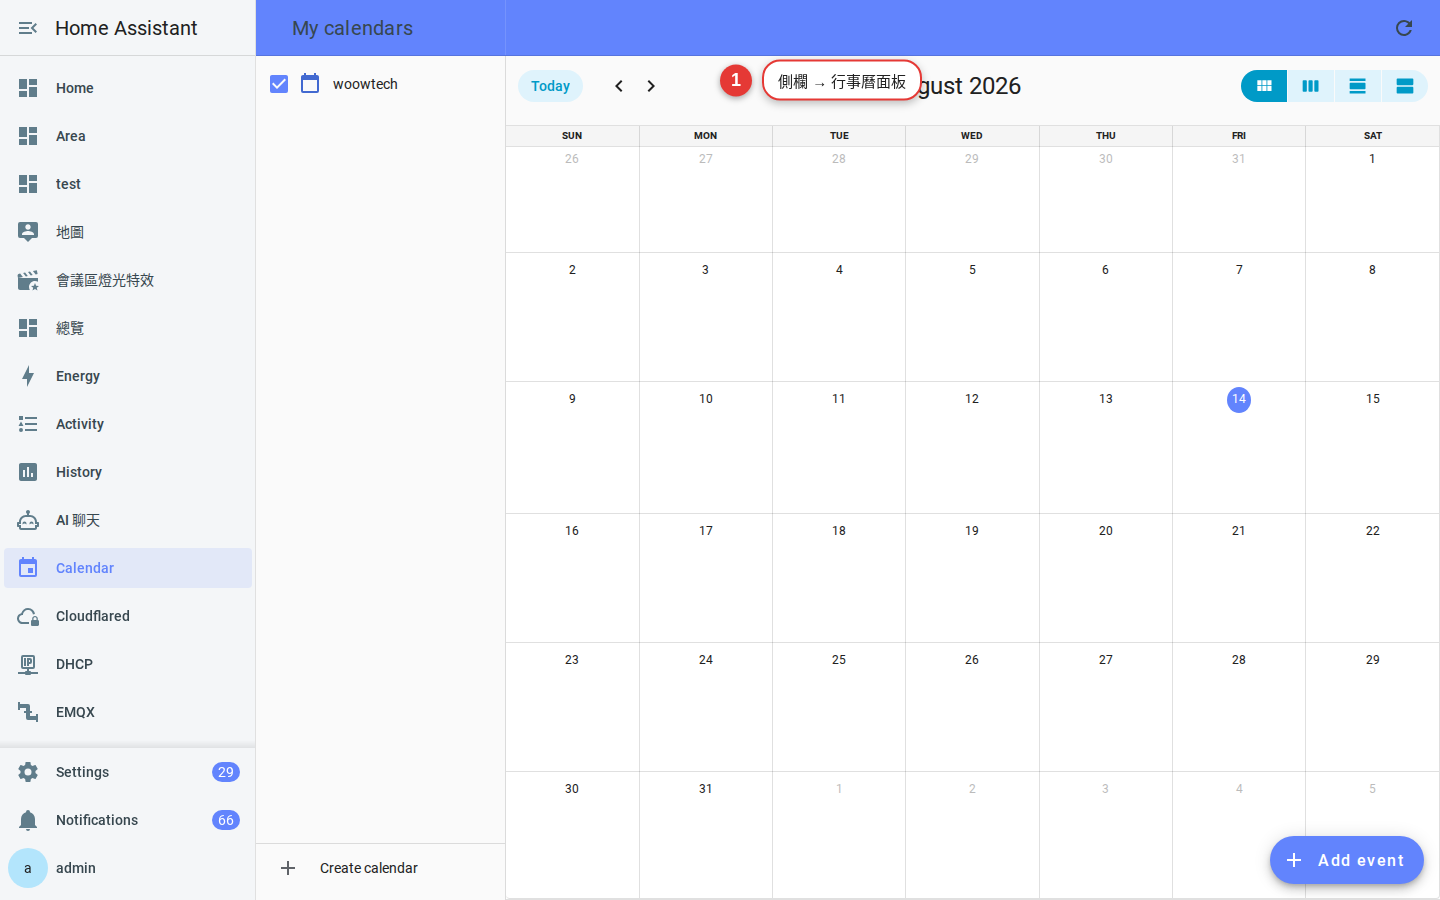
Figure 16-3 In the sidebar’s Calendar panel, select which calendars to display on the left, then select a day on the right to add or edit an event. -
Confirm entity ID and status
Settings → Tools → States, filter
calendar.. A calendar entity has two states:onwhile an event is in progress andoffotherwise.
on state as a reminder. It can represent only one event at a time and cannot provide advance notice. For reminders, use a calendar trigger with an offset, as described in the next section.An automation can also create calendar events, for example after a reservation is confirmed:
action: calendar.create_event
target:
  entity_id: calendar.family
data:
  summary: Family dinner
  start_date_time: "2026-09-20 18:00:00"
  end_date_time: "2026-09-20 20:00:00"
  location: Grandma’s house
summary (the title) is the only required field. There are three ways to specify the timing; choose exactly one:
| Syntax | Use | Example |
|---|---|---|
start_date_time + end_date_time
|
An event with specific start and end times | "2026-09-20 18:00:00" |
start_date + end_date
|
An all-day event | "2026-09-20" |
in (with days or weeks) |
An event a given number of days or weeks from now, without calculating the date | in: {days: 90} |
Connect Google Calendar and CalDAV
The obvious limitation of Local Calendar is that you cannot view it in a separate calendar app on your phone. If your household already uses Google Calendar, connect it to Home Assistant so that an event created in the Google app is also available to your automations.
Google Calendar
Google Calendar is the most involved setup in this chapter, and the complexity is on Google’s side rather than Home Assistant’s. The official instructions require you to create a Google Cloud project, enable the Google Calendar API, generate OAuth client credentials (a Client ID and Client Secret), and enter those credentials in Home Assistant. Home Assistant does not provide shared credentials.
After setup, each calendar under My calendars becomes a calendar. entity. Use google.create_event to add events through the integration.
calendar. entities, so the automation syntax remains unchanged.CalDAV (Nextcloud, iCloud, Synology…)
If you use Nextcloud, Baikal, ownCloud, Synology Calendar, or Apple iCloud, connect through the standard CalDAV protocol. According to the official documentation, servers compliant with RFC 4791 should generally work.
| Configuration method | Procedure | To-do-list support |
|---|---|---|
| User interface (recommended) | Settings → Devices & services → Add integration → CalDAV | Yes; creates todo entities |
| Manual YAML | Edit configuration.yaml
|
No; the official documentation explicitly states that the YAML method does not support to-do lists |
The main fields are url (the calendar’s full URL), username, and password. You can also use calendars or custom_calendars to select specific calendars, and verify_ssl (default: true) when a self-hosted server uses a self-signed certificate. The days option (default: 1) controls how many days of future events are fetched, but it works only under custom_calendars. Placing it at the top level has no effect.
Google Tasks (to-do list, not calendar)
Google’s task service also has an official Google Tasks integration. Added in Home Assistant 2023.11, it exposes your Google task lists as todo. entities. Be aware of two limitations:
- It supports a due date, but not a due time. This is a limitation of the Google Tasks API, not Home Assistant.
- The official polling interval is 30 minutes. An item added in the Google Tasks app does not appear in Home Assistant immediately; it may take until the next poll.
As with Google Calendar, setup requires your own Google Cloud credentials. Enable the Google Tasks API rather than the Google Calendar API.
Put lists and calendars on your dashboard
The built-in sidebar panels are already useful, but a dashboard lets you see the day’s work at a glance each morning. Add To-do list and Calendar cards. See Chapter 6 for the basics of editing dashboards; this section covers only these two cards.
-
Enter edit mode
Open your dashboard and select the pencil icon in the upper-right corner. Then select + Add card.
-
Add to-do list card
Find To-do list in the list of cards, then select your
todo.entity. -
Add calendar card
Add another card and select Calendar. This card can display several calendars together, using a different color for each one.
-
Fine-tune the cards with YAML
In the lower-left corner of the card editor, select Show code editor, then paste the configuration below.
To-do list card
type: todo-list
entity: todo.family_chores
title: Housework this week
hide_completed: true
display_order: duedate_asc| Option | Description | Allowed values |
|---|---|---|
entity |
Which list to display (required) | A todo. entity |
title |
Card title | Any text |
hide_completed |
Hide the section containing completed items |
true / false (default: false) |
hide_create |
Hide the New item field at the top |
true / false (default: false) |
hide_section_headers |
Hide the Incomplete and Completed section headings |
true / false (default: false) |
display_order |
Display order |
none (default), alpha_asc, alpha_desc, duedate_asc, duedate_desc
|
item_tap_action |
Action performed when you select an item |
edit (default; open the editor), toggle (mark complete/incomplete immediately) |
due_date_period |
Show only items due within a specified period | Use calendar below it, with period (day/week/month/year) and an optional offset
|
theme |
Apply a theme to this card | Any loaded theme name |
hide_create to true and hide_completed to true. For quick completion on a phone, set item_tap_action to toggle.Another useful but often overlooked option is due_date_period. It limits the card to items due within a specified period. To create a “Things to do today” card, use:
type: todo-list
entity: todo.family_chores
title: To do today
hide_completed: true
due_date_period:
  calendar:
    period: day
Change period to week for tasks due this week. offset shifts the selected period forward or backward: for example, period: week with offset: 1 means next week.
Calendar card
type: calendar
title: This month
entities:
  - calendar.trash_day
  - calendar.family_chores
  - calendar.bills
initial_view: listWeek| Option | Description | Allowed values |
|---|---|---|
entities |
List of calendars to display (required) | One or more calendar. entities |
title |
Card title | Any text |
initial_view |
Default view when the card loads |
dayGridMonth (month grid), dayGridDay (single day), listWeek (list) |
theme |
Apply a theme to this card only | Any loaded theme name |
dayGridMonth can be difficult to read on a phone. Test listWeek for small screens and reserve the month grid for larger displays.listWeek shows the next 7 days, not the current Monday-through-Sunday week. Opened on Friday, it covers Friday through the following Thursday.Use calendar events to trigger automations
This is the most valuable section in the chapter. A complete calendar trigger requires only a few lines:
triggers:
  - trigger: calendar
    entity_id: calendar.trash_day
    event: start
offset: "-00:20:00"| Field | Meaning |
|---|---|
entity_id |
Calendar entity to monitor |
event |
start (event starts) or end (event ends) |
offset |
Time offset in "hour:minute:second" format. A leading minus sign runs the trigger early; no minus sign delays it. The -00:20:00 above means “20 minutes before the event starts” |
-00:02:00 are unreliable. In practice, allow at least 10 minutes. Use a Time trigger when you need alarm-clock precision.Use event details directly
When the trigger fires, event data is available under trigger.calendar_event for use in notifications and conditions:
| Variable | Contents |
|---|---|
trigger.calendar_event.summary |
Event title |
trigger.calendar_event.description |
Event description, when provided |
trigger.calendar_event.location |
Location, when provided |
trigger.calendar_event.start |
Start value, such as 2026-04-10 or 2026-04-10 11:30:00-07:00
|
trigger.calendar_event.end |
End value |
trigger.calendar_event.all_day |
Whether the event is all day |
For an all-day event, start contains a date only; timed events include time-zone information. Extract the date with {{ trigger.calendar_event.start[:10] }}.
Six practical examples you can use now
You can paste each example directly into the automation editor’s YAML mode (the three-dot menu in the upper-right corner → Edit in YAML). Remember to replace every entity ID with your own.
1. Trash day reminder
First, create a Local Calendar named “Trash collection,” then add the collection time as a weekly recurring event.
alias: Garbage collection is approaching
triggers:
  - trigger: calendar
    entity_id: calendar.trash_day
    event: start
    offset: "-00:20:00"
actions:
  - action: notify.mobile_app_my_phone
    data:
      title: Garbage collection in 20 minutes
      message: "{{ trigger.calendar_event.summary }} | Do you have the bag?"
  - action: light.turn_on
    target:
      entity_id: light.entrance
    data:
      brightness_pct: 80
mode: single
Turning on the entryway light may be more effective than a push notification. You can ignore a notification, but a light that is unexpectedly on can prompt you when you walk past.
2. Payment deadline: send a reminder on the due date
Use a to-do list rather than a calendar because an unpaid bill should remain visible until it is complete. This automation scans the list every morning at 8:00 and looks for items due that day:
alias: Items due today
triggers:
  - trigger: time
    at: "08:00:00"
actions:
  - action: todo.get_items
    target:
      entity_id: todo.family_chores
    data:
      status: needs_action
    response_variable: result
  - variables:
      today: "{{ now().date() | string }}"
      due_today: >-
        {{ result['todo.family_chores']['items']
           | selectattr('due', 'defined')
           | rejectattr('due', 'none')
           | selectattr('due', 'search', today)
           | map(attribute='summary') | list }}
  - if:
      - condition: template
        value_template: "{{ due_today | count > 0 }}"
    then:
      - action: notify.mobile_app_my_phone
        data:
          title: "{{ due_today | count }} items are due today"
          message: "{{ due_today | join(', ') }}"
mode: single
The three filters in the middle are essential. selectattr('due', 'defined') first keeps only items that contain a due field. rejectattr('due', 'none') then removes items whose field is null. Finally, selectattr('due', 'search', today) keeps due values containing today’s date. Without the first two filters, a single item without a due date can make the entire automation fail with a template error.
due as a date string such as 2026-09-01 or as a date and time, which affects the filter. Test this block under Settings → Tools → Templates with your provider’s actual response before enabling the automation. Confirm that it returns the expected item names.3. Air-conditioning filter replacement: create a to-do from a calendar
This is a classic calendar-and-to-do combination. The calendar tracks the maintenance interval. When the event begins, Home Assistant automatically adds an item to the to-do list. Complete it when you have time, then mark it done:
alias: Create to-do items from the maintenance calendar
triggers:
  - trigger: calendar
    entity_id: calendar.maintenance
    event: start
actions:
  - action: todo.add_item
    target:
      entity_id: todo.family_chores
    data:
      item: "{{ trigger.calendar_event.summary }}"
      due_date: "{{ trigger.calendar_event.start[:10] }}"
      description: "{{ trigger.calendar_event.description }}"
mode: queued
max: 10
Add several all-day events to the “Maintenance” calendar and repeat them every three months: “Clean the living-room air-conditioning filter,” “Replace the water-filter cartridge,” and “Clean the washing machine.” Configure each event once, and the corresponding task will appear automatically every quarter.
mode: queued with max: 10 allows multiple maintenance events that start together to run in sequence. With the default single mode, an overlapping run is rejected. See Chapter 10.4. Chore rotation
In the “Chore rotation” calendar, make the event title the assignment itself—for example, “Alex does the dishes this week”—then use:
alias: Household chore rotation reminder
triggers:
  - trigger: calendar
    entity_id: calendar.chore_rotation
    event: start
    offset: "-01:00:00"
actions:
  - action: todo.add_item
    target:
      entity_id: todo.family_chores
    data:
      item: "{{ trigger.calendar_event.summary }}"
  - action: notify.family_all
    data:
      title: Chore rotation
      message: "In one hour: {{ trigger.calendar_event.summary }}"
mode: queued
max: 10
notify.family_all is the example notification group configured in Chapter 7.
5. Meeting room: control lighting and cooling from one event
This is especially useful in a small office. Connect the meeting-room booking calendar to Home Assistant through Google Calendar or CalDAV. Turn on the lights and air conditioning 10 minutes before a meeting, then turn them off when it ends:
alias: Control a meeting room from its bookings
triggers:
  - trigger: calendar
    id: meeting_start
    entity_id: calendar.meeting_room
    event: start
    offset: "-00:10:00"
  - trigger: calendar
    id: meeting_end
    entity_id: calendar.meeting_room
    event: end
actions:
  - choose:
      - conditions:
          - condition: trigger
            id: meeting_start
        sequence:
          - action: light.turn_on
            target:
              entity_id: light.meeting_room
          - action: climate.turn_on
            target:
              entity_id: climate.meeting_room
      - conditions:
          - condition: trigger
            id: meeting_end
        sequence:
          - action: light.turn_off
            target:
              entity_id: light.meeting_room
          - action: climate.turn_off
            target:
              entity_id: climate.meeting_room
mode: queued
max: 10
This example demonstrates a useful pattern: assign an id to each trigger, then branch with choose. Keeping the related start and end behavior in one automation is clearer than maintaining two. If your climate integration does not support climate.turn_on, use climate.set_hvac_mode. See Chapter 12 for actions available in each domain.
6. Remove completed items every week
alias: Clear completed items on Sunday night
triggers:
  - trigger: time
    at: "22:00:00"
conditions:
  - condition: time
    weekday:
      - sun
actions:
  - action: todo.remove_completed_items
    target:
      entity_id: todo.family_chores
mode: singletodo.remove_completed_items permanently deletes completed items; there is no recycle bin. Do not schedule this automation if you want to review what you completed during the month. Alternatively, run it only once a month.Connect notifications and voice assistants
Notifications: make reminders visible
Every example above ultimately depends on its notification being noticed. Companion App setup, finding notify.mobile_app_* entity IDs, and notification groups are covered in Chapter 7. Here are three techniques that work especially well with to-do lists and calendars:
-
Put the event title directly in the message—with
{{ trigger.calendar_event.summary }}, one automation can serve every event in a calendar instead of requiring one automation per event. -
Add conditions to avoid disturbing people at night—use a time condition under
conditions:, or check whether anyone is home. A trash-collection alert is not useful when everyone is away for the day. - Do not limit notifications to phones—in a meeting room, flashing a light twice or making a voice announcement may be more effective than a push notification.
Voice: add shopping-list items aloud
Voice assistants are a natural fit for this chapter. When your hands are greasy and the refrigerator door is open, speaking a command is much faster than reaching for your phone. Keep these points in mind:
- The official Shopping list documentation explicitly states that you can add items with voice commands; its English example is “Add eggs to my shopping list.”
- Sentence support varies by language. Home Assistant does not support every phrasing in every language, and behavior depends on your version and voice-assistant configuration. The fastest test is to open the Assist dialog in the upper-right corner and type a sentence instead of speaking it. Check whether Assist recognizes the request.
- If the built-in sentence patterns do not recognize your preferred phrasing, create custom sentences that map your usual words to
todo.add_item. See the voice-assistant chapter for setup instructions.
Troubleshooting
-
Google authorization expires every 7 days and repeatedly asks me to sign in
The OAuth consent screen is almost certainly still in Testing. The official documentation warns that authorization tokens in this state expire every 7 days. Return to the OAuth consent screen in Google Cloud Console, select Publish app to change the publishing status, then authorize Home Assistant again. The authorization should then remain active.
-
Google authorization immediately fails with “redirect_uri_mismatch” or a similar error
The redirect URL registered with Google does not match the one sent by Home Assistant. Copy the redirect URL from the official Home Assistant documentation into the Google credential settings exactly. Capitalization and a trailing slash both matter. Also confirm that you have enabled the Google Calendar API; many users create credentials but forget to enable the API.
-
Event times are several hours off (time-zone mismatch)
Check three places in order:
(1) Home Assistant time zone—Under Settings → System → Home information, confirm that Region uses your time zone. The zh-TW source usesAsia/Taipei; choose the value for your location. If the field is unavailable, check whetherconfiguration.yamldefines it, as explained in Chapter 2.
(2) The time zone of the source calendar—Google Calendar itself has a calendar time zone setting. If it is another time zone, the entire set of events will be offset.
(3) All-day event—An all-day event hasall_dayset to true, andstartcontains only a date. Checkall_daybefore applying time-based comparisons. -
Calendar automation did not trigger when it should have
First ask how recently you created the event. The official documentation states that calendars are read only every 15 minutes. If you have just created an event that should trigger in 5 minutes, Home Assistant may not fetch it in time. The second common cause is an incorrect
offset: an early trigger requires a minus sign."-00:30:00"means 30 minutes before the event;"00:30:00"means 30 minutes after it. Third, open Settings → Automations & scenes, select the automation, then open the upper-right three-dot menu → Traces. Check whether it fired and which step stopped. -
A to-do item created on my phone does not appear in Home Assistant
First identify which integration you use. Local To-do has no external synchronization; its items exist only in Home Assistant. Cloud providers can lag behind because they poll periodically: Google Tasks polls every 30 minutes, and CalDAV also refreshes on an interval. If an item still does not appear after the documented interval, open Settings → Devices & services, find the integration, and select Reload from its three-dot menu to force a refresh.
-
todo.update_itemreports that it cannot find the itemCheck three things: (1) the name must match exactly; an extra space or a different character width counts as a different name; (2) if the list contains two identically named items, Home Assistant cannot determine which one to update, so use the
uid—first calltodo.get_itemsto retrieve the UID, then supply it in theitemfield; and (3) verify theentity_id, because you may be targeting a different list. -
Adding an item reports an invalid due-date parameter
The most common cause is specifying both
due_dateanddue_datetime; you must choose one or the other. The list may also lack support for due dates or descriptions. Not every integration supports every field—for example, Google Tasks supports dates but not times. Remove the unsupported parameter and try again. -
The To-do lists panel keeps reporting an error after I remove an integration
A dashboard card still points to an entity that no longer exists. Enter edit mode and remove the orphaned card. Before removing an integration, check whether any card or automation uses it; this habit prevents many problems.
FAQ
Where is Local To-do data stored, and does a backup include it?
Must I create a Google Cloud project to use a calendar? Is there an easier option?
Why can I see an event on the Calendar card when its automation did not trigger?
offset lacks a minus sign, so the trigger runs after the event starts; or (3) the visible event belongs to another calendar. A card can display several calendars, but a trigger targets only one. Verify the entity_id. If the cause is still unclear, inspect the automation’s Traces.How do I use the output from todo.get_items? I do not understand response_variable.
todo.get_items is different because it returns data. That response needs a name so later steps can reference it; this name is the response_variable. If you write response_variable: result, you can then access the item array as result['todo.your_list']['items']. Every item has the fields summary (name), uid, and status. The due (due date) and description fields are optional and are entirely absent when not set. This frequently breaks new users’ templates, so filter first with selectattr('due', 'defined'). We strongly recommend opening Settings → Tools → Actions and running todo.get_items by itself. Inspect the actual response before writing the template.Can Home Assistant remind me every day until I complete an item?
todo.get_items at a fixed time each day and retrieve only items with the needs_action status. If the result contains any items, send a notification. Because the automation scans the list every day, the reminder continues until you mark the item complete. To limit the reminders, add a condition that includes only the three days before the due date, or use a Helper from Appendix B, such as a toggle that pauses reminders.Can everyone in the household share and edit the same list from their phones?
hide_create: true on the To-do list card in the children’s tab to remove its input field. This is not a true permission boundary, but it may be sufficient for a household.Will Shopping list and Local To-do conflict if I install both?
shopping_list.* actions work only with Shopping list, not with lists created through Local To-do. The todo.* actions work with both, so prefer todo.* whenever possible.How can I act only when a calendar event title contains “Take out the trash”?
{{ 'Take out the trash' in trigger.calendar_event.summary }}. Events that do not match stop at that condition. Better still, separate events with different purposes into different calendars. This keeps the automation much simpler and avoids a template. If you do use a template, test it first under Settings → Tools → Templates.